Exhibit Preparation - Making Mounts

Exhibit Preparation – Making Mounts

Our exhibit process starts months ahead of a scheduled opening. The initial meeting of an exhibit team reviews the theme and broad content description, and confirms dates for milestones such as public opening, label copy completion, etc.

Once the Curator has finalized artifacts and/or specimens that will be used, Collections and Conservation staff go into action. The Collections Assistant pulls the objects from storage so the Designer can start working on a layout. The Designer, Curator and department Manager (me) meet to look at the laid-out objects to discuss required mounts and any conservation concerns. The Conservators complete condition reports and start on the mounts. Usually, the Conservators make all soft mounts-that is, mounts made from foam, Coroplast or matboard- while our Productions staff makes mounts that need to be metal or Plexiglas. For the Discovery Room exhibit that just opened, Conservators Lisa May and Ellen Robinson made mounts from Coroplast and Ethafoam; Gallery Technician Wayne Switek made a painted steel mount for a large taxidermied bison head, which is quite heavy and needed the strength and rigidity of a metal mount.

To make mounts for the hide shirt and dress in the exhibit, Lisa and Ellen used Ethafoam, a brand name for extruded, closed cell polyethylene foam widely used by museums. The Ethafoam comes in 2 foot by 8 foot planks. Two inches is the thickest available, so slabs are cut roughly to size and glued together with water based contact cement.

An individual using a hand tool to carve off a section of a large square of foam on a table.

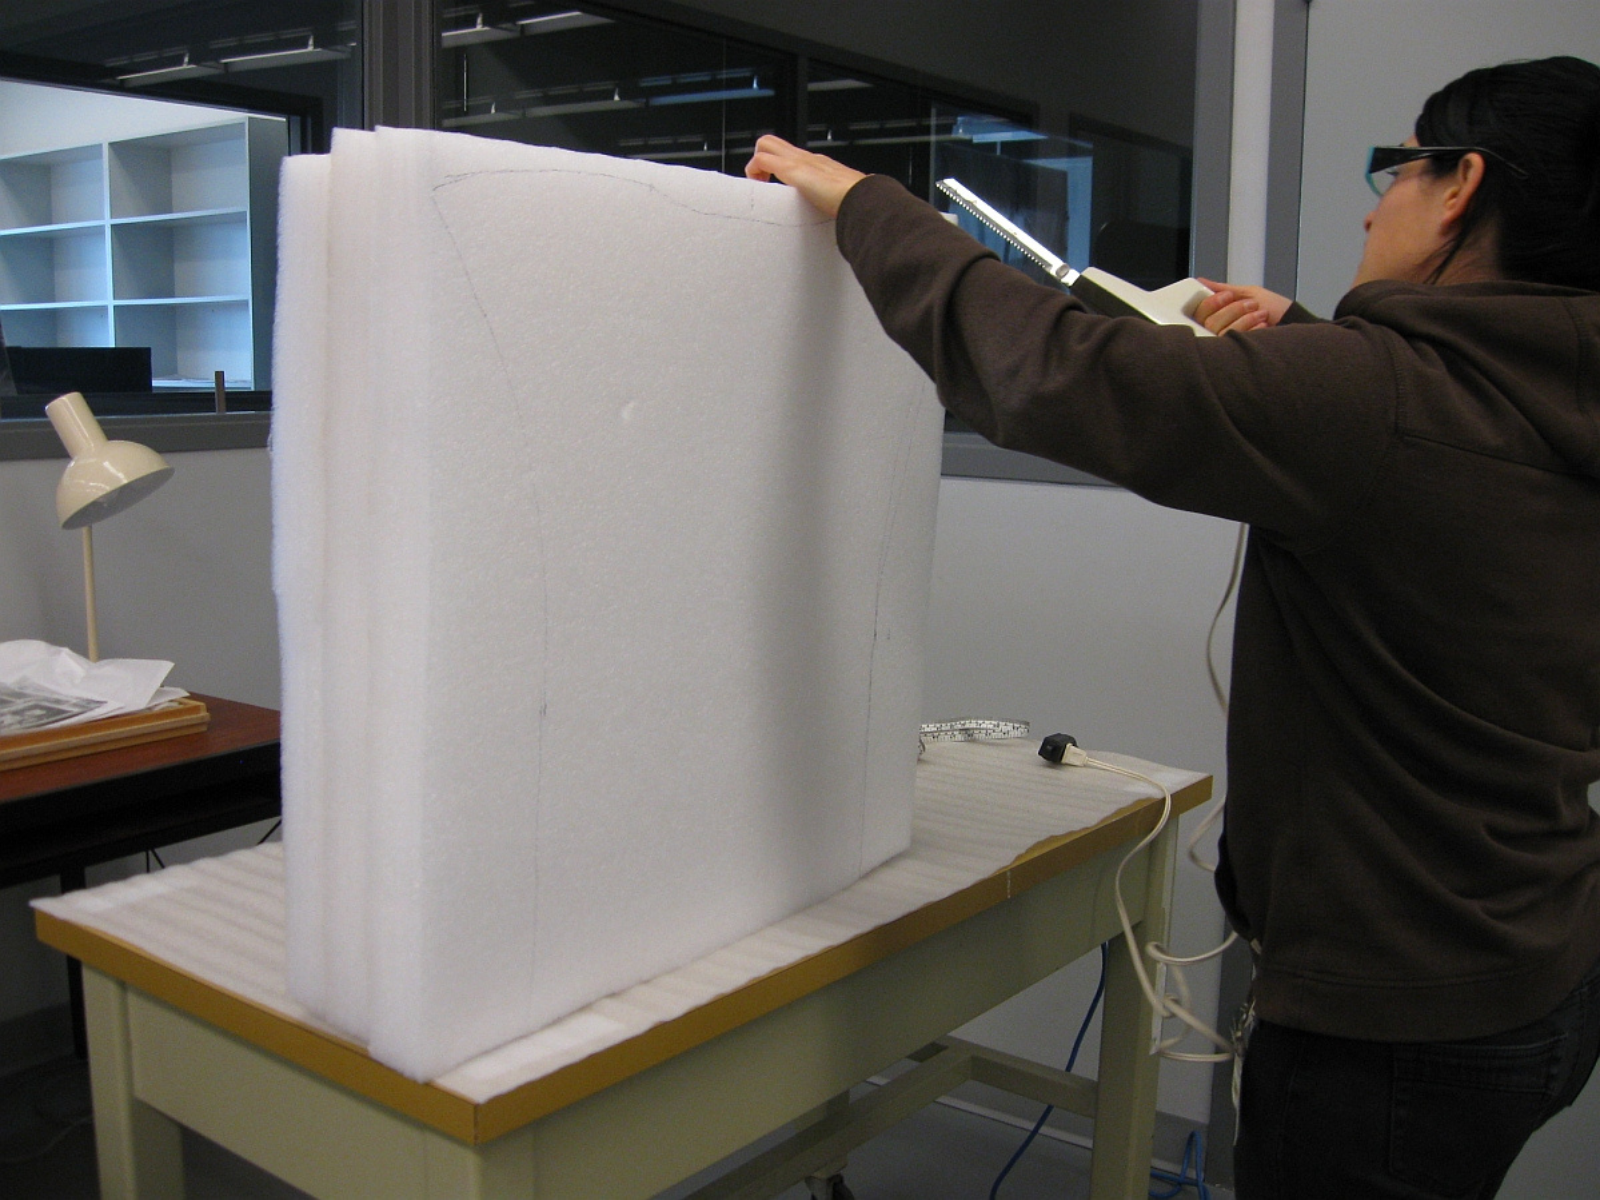
Lisa starts cutting to shape with an electric knife.

An individual using an electric knife hand tool shaping a large piece of foam on a table top.

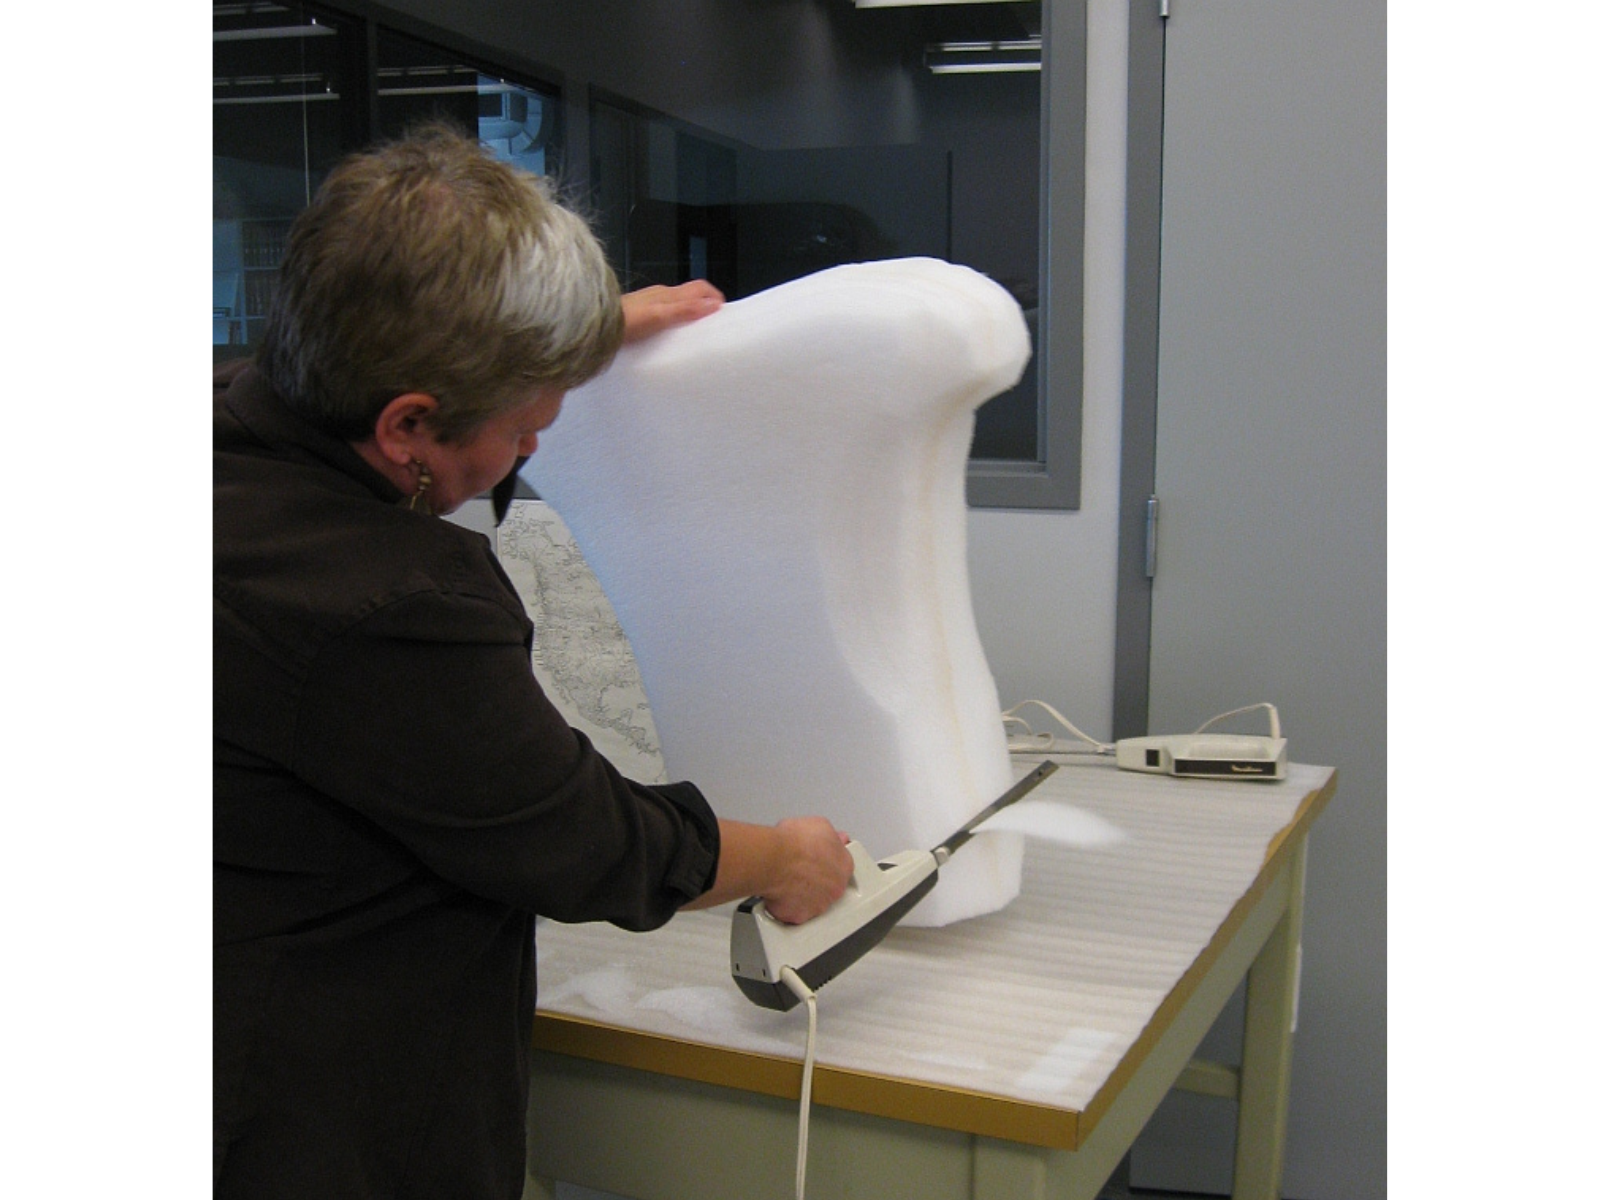
Often, a lot of trimming is required.

An individual wrapping a carved piece of foam in white cotton batting.

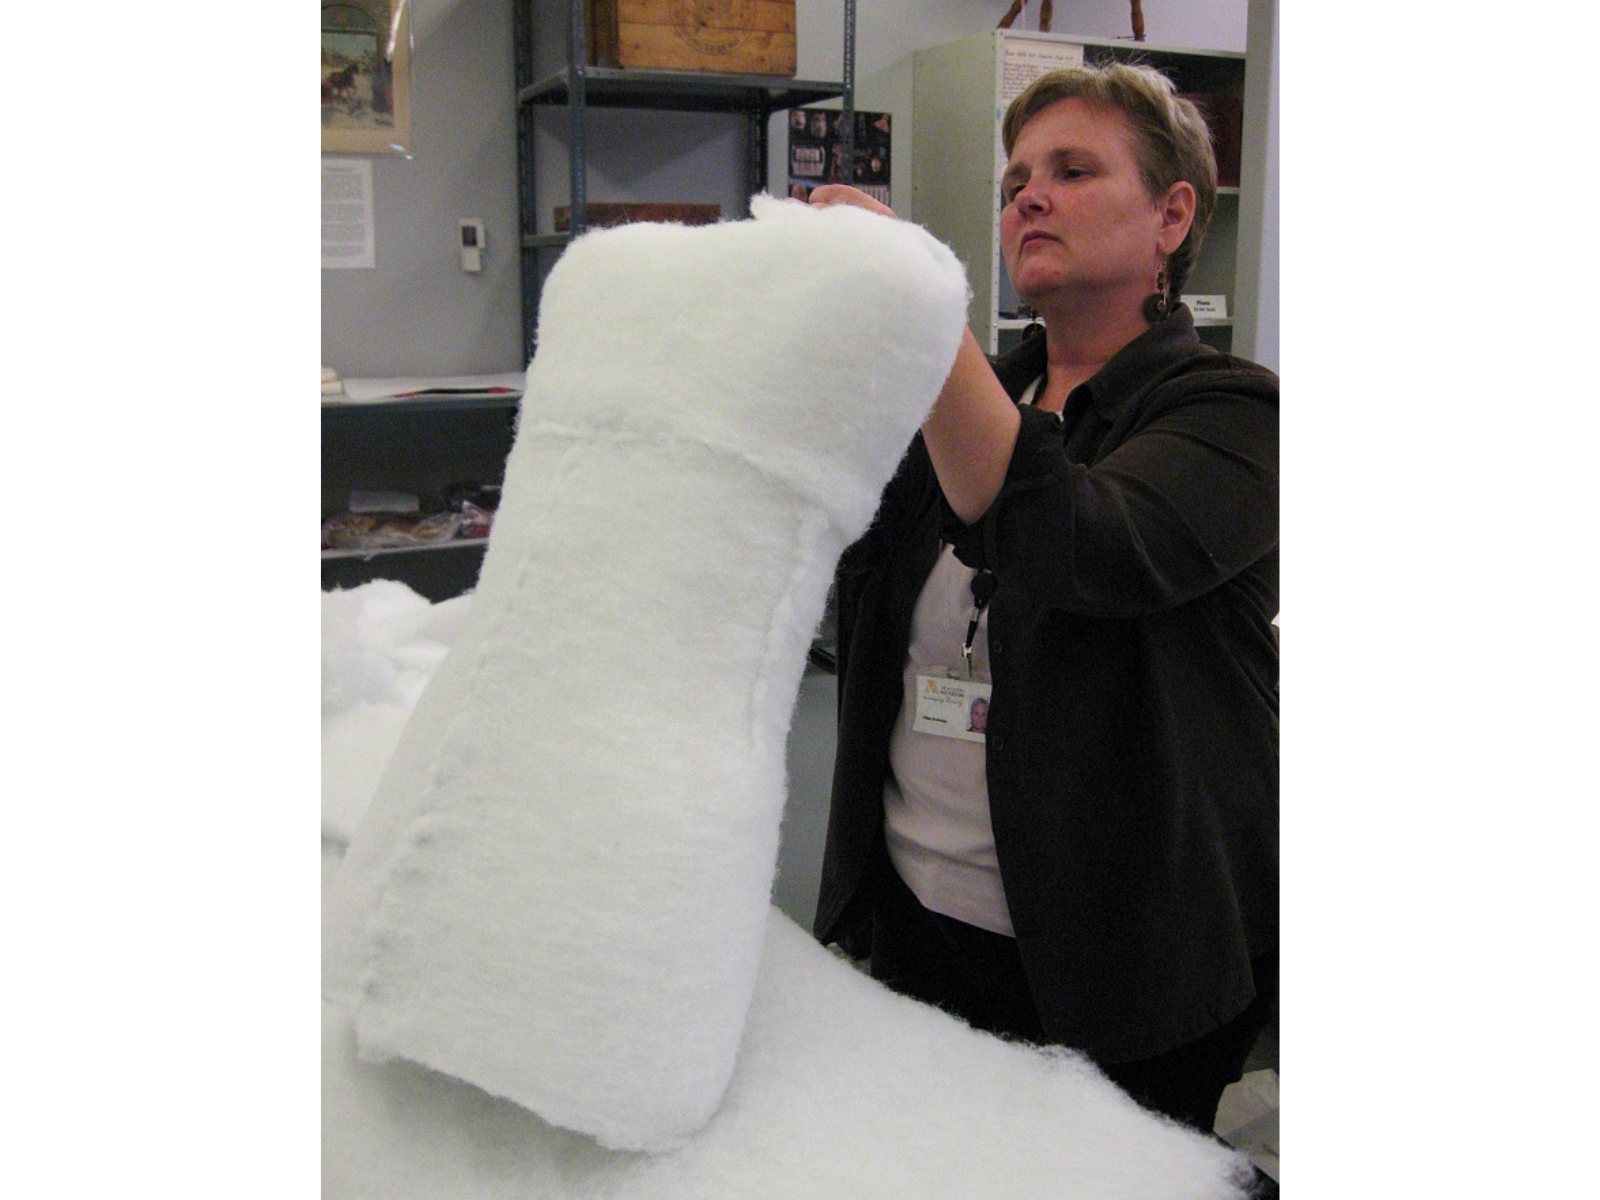
Next, a layer of polyester quilt batting is added for padding.

A layer of dark fabric being wrapped around a large carved block of foam on a table top.

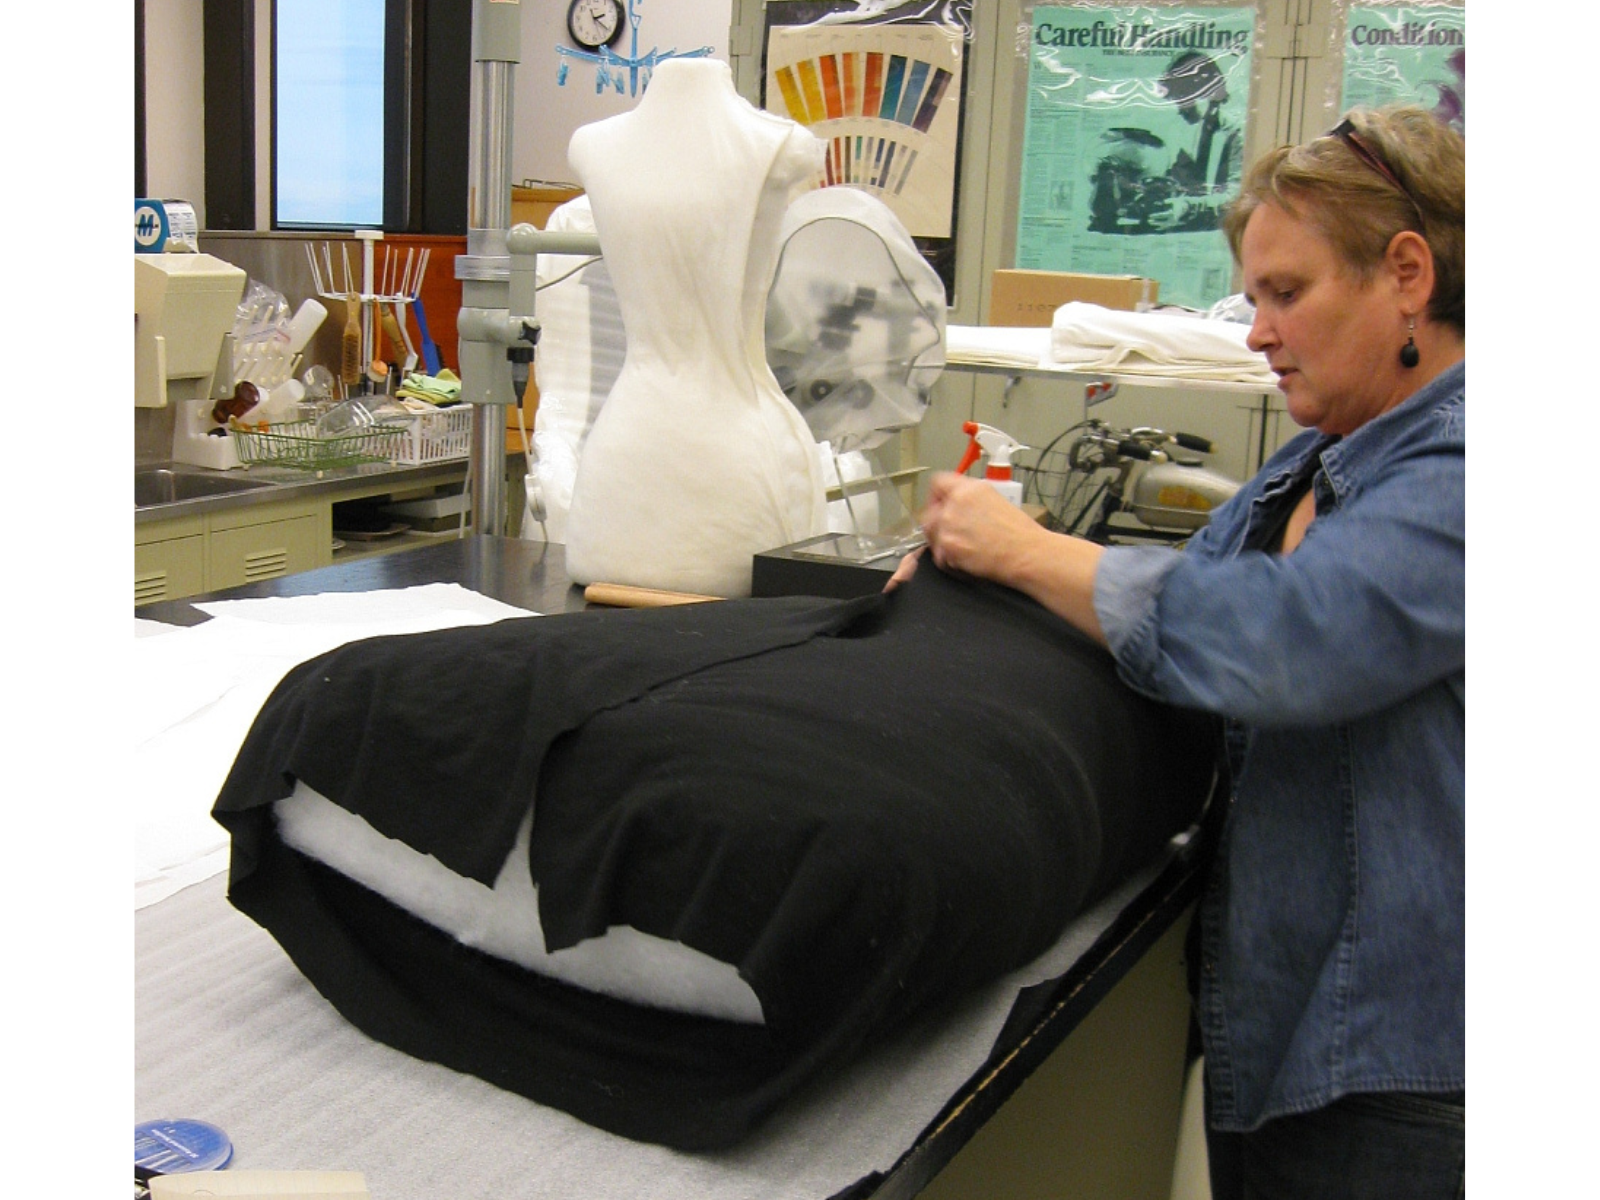
Poly/cotton stretch knit fabric makes a final covering.

A beaded and fringed hide dress and shirt each placed on standing mannequin stands.

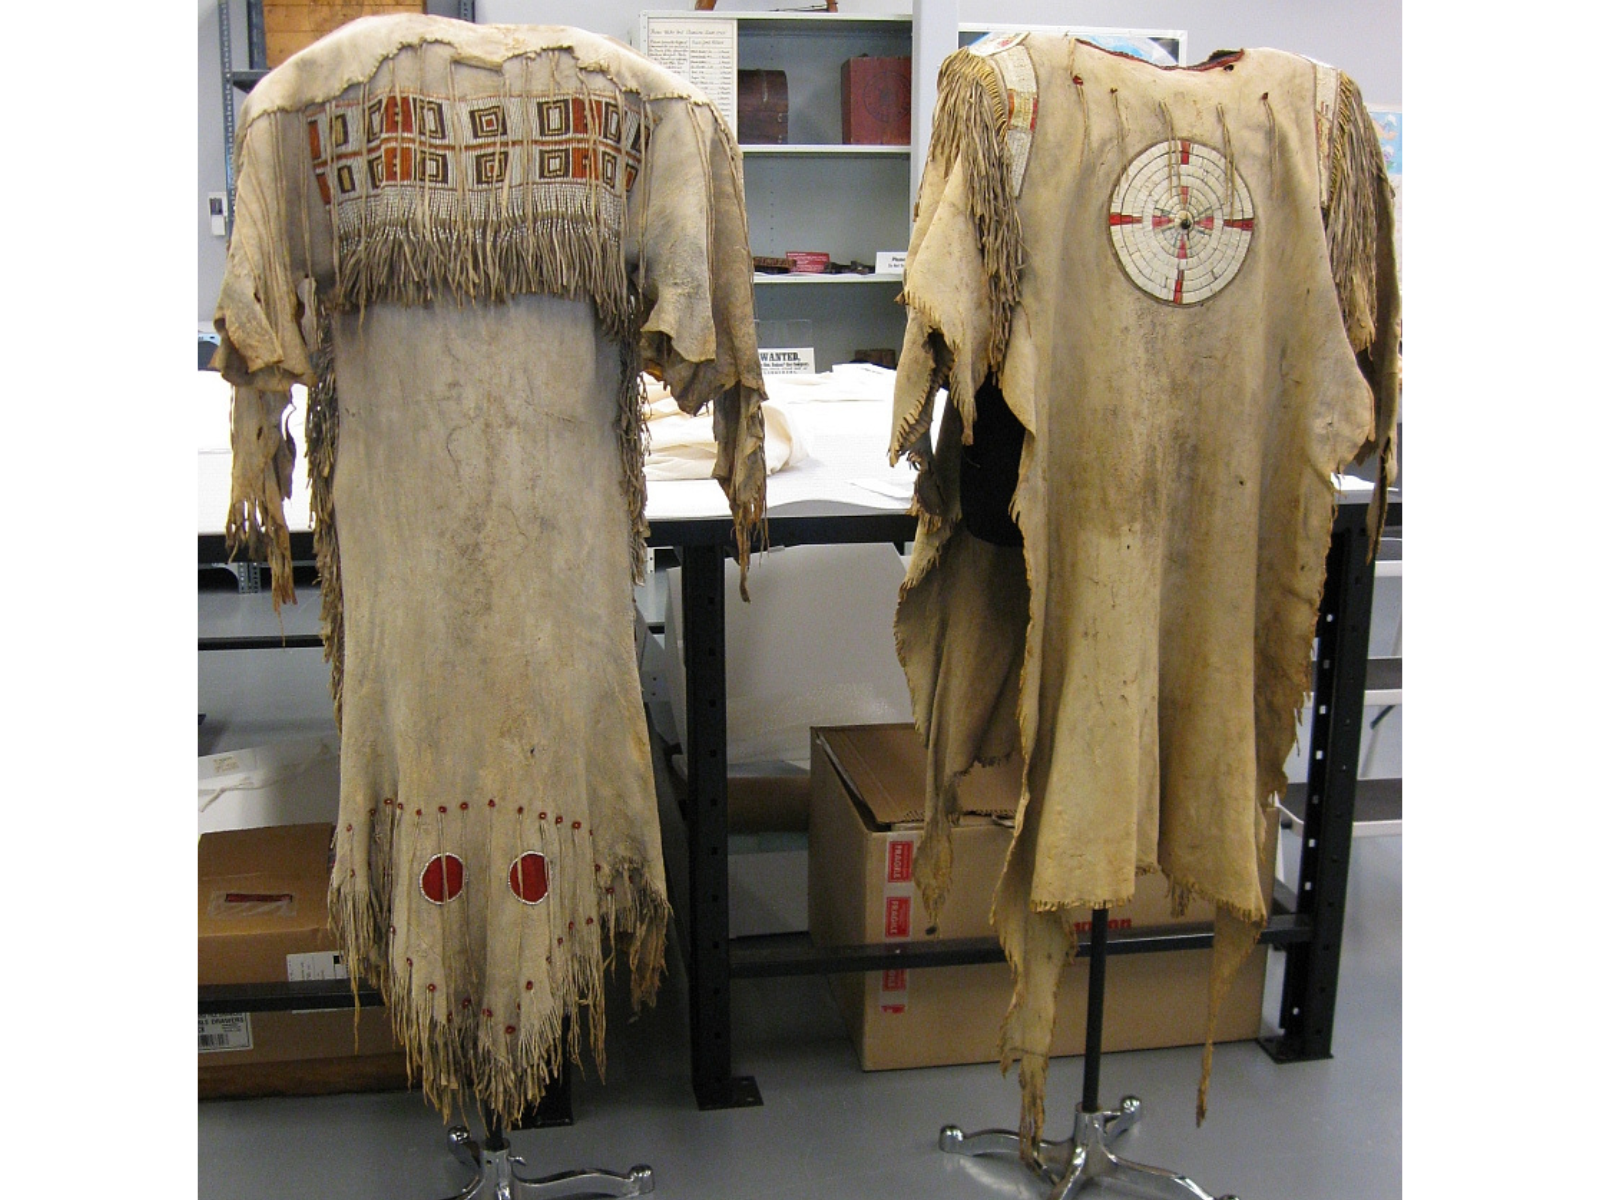
The dress and shirt on their mounts, ready for installation.

Next time, I’ll show you some pictures of us putting the artifacts in their display cases.

The Exhibit Collaboration

By Dr. Graham Young, past Curator of Palaeontology & Geology


An exhibit is a group invention. A curator devises and develops the content of the exhibit, deciding what specimens and other materials should be shown, and writing text about those materials. But most successful exhibits evolve through collaboration, in which the curator is but one player.

At this Museum, we have a well-defined process in which exhibits go through distinct development stages. Many people are involved as key decisions are made, and as work is carried out. There are, of course, the directors and administrators who ensure that schedules are followed and money is spent wisely, and who review the plans to ensure that they meet institutional standards and mandate. And there are the production experts who build casework, install lighting, create mounts, or make models. If specimens or artifacts are to be installed, then the collections and conservation staff will handle and treat them with the care they deserve. And there are meticulous editors who work diligently to check that “i”s are dotted and the “t”s are crossed, and not the other way around.

A section of the final time line layout.

This is a section of the final time line layout. The time line gives a very quick “Cook’s Tour” through key events in the first four billion years of Earth history.

A timeline graphic with notes and images for the exhibit.

If the exhibit depends on a spatial configuration of objects and information, then the curator may produce a sketch. This layout above was my first stab at fitting together materials for the exhibit. As with so many curatorial exercises, this first go had too many words!

Stephanie’s first draft layout is mostly concerned with where the big “blocks” of design will be located. The key considerations at this point are technical issues such as the height of exhibits relative to the viewer, the design of cases, and where access doors will be located.

A designer mock-up of an exhibit with silhouettes of visitors.

A first draft layout of an exhibit with blocks of text and images.

An initial layout with most of the content is rather “blocky”, and some details are higher on the wall than Stephanie would like. From my point of view, there are issues that some content is nowhere near where it should be on the time line. We like the colours and the overall feel, but there is a long way to go.

Draft titles have now been added, and the content has been shifted around so that it better matches the timeline. So now I am much happier, but Stephanie finds this way too busy, as do other staff. Images and text must be cut, and we are going to have to do some serious horse trading to come up with something that is acceptable to all concerned.

A designer mock-up of an exhibit with silhouettes of visitors.

A initial layout of an exhibit with blocks of text and images.

An final layout of an exhibit with blocks of text and images.

This one is nice and simple, but now a lot of content has been removed, and we will have to find a way to fit it back in.

The (almost) final design is radically different from what we started with. It is simpler, cleaner, yet it distills all the key points of exhibit content. There are still some place holder titles and images here, which will be modified in the final design as it goes to print.


Image: The final design of the exhibit.

Looking for the Invisible

By Kevin Brownlee, past Curator of Archaeology


I have long marveled at the beautiful stone woodworking tools that are in the archaeology collection at the Manitoba Museum and wondered what they were used for. It may seem like an odd question as these tools were obviously used for working wood. I wonder what past peoples made with these tools. Since understanding how all tools were used in the past is important for archaeologists, we are often searching for the invisible or the material culture that does not preserve. This is a major issue for archaeologists as we can only recover and study the durable material culture (stone, ceramic, bone). Non-durable items are rarely recovered and include items made from wood, bark, and hide. Although we can only study the durable material we must keep in mind the non-durable items that were used in the past.

An oblong carved stone tool with sharpened edges.

Stone Aaze from TMM collection.

An oblong carved stone tool with sharpened edges.

Stone adze from TMM collection.

An oblong carved stone tool with sharpened edges.

Stone adze from TMM collection.

The question remains… what were they making with these stone woodworking tools? Of course wood was very important to past people for constructing lodges; hide stretching frames and smoking racks. We also assume that finer items were carved including ladles, spoons, and bowls. Larger items were also manufactured including toboggans, snow shoe frames, paddles and canoes. By being aware of the non-durable materials and how durable items were used in the making of such items you can better appreciate the past and better interpret archaeological material.

A black and white photo of a hide stretched on a frame.

Moose hide on rack (TMM).

A black and white photo of a person using a tone tool to carve a wooden paddle.

John B. Moose making paddle (TMM).

One of many sophisticated technologies developed by First Nation people was the birch bark canoe. How long ago these were developed is unknown but populating the dense boreal forest of northern Manitoba 7,000 years ago would have been impossible without some form of water transportation.

Birch bark canoes were encountered by Europeans at contact and were far superior to any European water craft. Europeans quickly abandoned their boats in favour of First Nation made bark canoes, which were light and easily navigated the rivers and lakes of the interior.

On the left, two red antler pieces shaped into a pick and wedge. On the right, a charcoal drawing of a bone awl.

Contemporary birch bark canoe makers use a variety of tools including metal awls, axes, wooden wedges, froes, metal chisels, draw knives, and crooked knives. In the past bone awls, stone, antler and wood wedges, stone axes and adzes, bone chisels, and beaver incisors were used. We have found stone axes and adzes (woodworking tools), stone and antler wedges, bone awls, bone chisels at ancient camp sites and these may have been used in the manufacture of birch bark canoes. I had the good fortune this August to have the opportunity to participate in the making of a birch bark canoe. Although it was made during my vacation it gave me a better appreciation of this technology and how to interpret the archaeological collections at the Manitoba Museum.


Image: (Left) Antler pick and wedge (TMM), (Right) Moose bone awl drawing (TMM).

Stay tuned for my next blog that documents my experience in making and using a birch bark canoe.

It’s a Gas: Fumigation is an important tool to protect collections

We are in the process of fumigating some of our collections. All of the Natural History specimens that were on exhibit in the Discovery Room, as well as some taxidermied mounts (ie. stuffed animals), have been placed in our fumigation bubble to be treated. This is a regular procedure for objects that are susceptible to insect attack.

The Manitoba Museum has a large enclosure (“the bubble”) made of heavy duty plastic, with a steel frame inside, that is used to treat objects with carbon dioxide gas. The bubble is filled with carbon dioxide to at least a 60% level, to displace the oxygen. The resulting low level of oxygen, if maintained for 14 days, will kill insects at all life stages – adult, larva or egg.

A rectangular shape covered with a bright blue tarp.

Here is a picture of our fumigation bubble.

Three grey tanks of carbon dioxide standing against a wall in front of a smaller grey metal box.

Here are the tanks of carbon dioxide.

This treatment has been conducted many times over the ten years that we’ve had the bubble in place. It is completely effective in eradicating any insects found on museum objects. The procedure is a preventive measure that is used as part of an Integrated Pest Management program, in order to keep our collections free of damage from museum pests.

Whenever circumstances pose a risk to objects, such as receipt of new acquisitions from outside, return of loans to other institutions, or removal from display in the galleries, they are put through some kind of treatment against pests. Usually, it’s freezing, which is a simple, effective way to kill insects in most circumstances. It’s not always appropriate, though. Very large objects (such as a muskox) can’t fit into any of our freezers. Thick objects also don’t freeze well, because by the time the center of the object is frozen, the insect has adapted to the temperature change and isn’t killed (they’re quite amazing that way!) Also, if we have a large number of objects, freezing isn’t logistically feasible. In these cases the fumigation bubble is ideal.

Whom to be Thankful to on Thanksgiving

Ask anyone if they can name a type of Ukrainian food and they will immediately answer perogies. Italian food is clearly spaghetti and meatballs while spicy, peanut-based curries are classic Thai fare. But ask someone to name a Canadian or American dish and most people will either draw a blank or perhaps mutter something about hamburgers and hot dogs (which are actually German) or pizza (which is Italian). It is unfortunate that so many of us forget that a traditional Thanksgiving dinner features some of the many foods that are native to the Americas.

First of all what do I mean by a traditional Thanksgiving dinner? I tend to think of roast turkey, cranberry sauce, wild rice and chestnut stuffing, cornbread, mashed potatoes, sweet potatoes, baked squash and, for dessert, pumpkin, blueberry, maple sugar, and/or pecan pie. What is unknown to many people is that the main ingredient in each of these foods is native to the Americas.

Museum display case of wild rice.

Manitoba Museum exhibit on wild rice in the Boreal Gallery.

A selection of six gourds of various shapes and textures.

Gourds and winter squash are native to the Americas.

Turkeys were found wild all over North America. Cranberries and blueberries are low shrubs that grow in the boreal forests of Canada and the southern United States; they are now raised commercially. Wild rice is grown and harvested by First Nations in the wetlands of northeastern Canada. Pecan, maple, and American chestnut trees dominated the eastern deciduous forests in Canada and the United States. Although pecan and maple trees are still common, the American chestnut is almost extinct, the victim of a disease (i.e. Chestnut blight) accidentally brought to the Americas from Asia. Corn and squashes (including pumpkins) were originally bred by the indigenous peoples of Mexico and Central America, while potatoes were a staple of the Peruvian Inca.

The trade of seeds and migration of indigenous peoples throughout the Americas resulted in the spread of these food crops far from their centers of origin. When Europeans first arrived, corn, beans, and squash (called “the three sisters” by First Nations) were being grown in North America in a unique polycultural system. The corn acts as a pole for the beans to climb up, the beans fix nitrogen in the soil for the corn and the squashes suppress weeds and help the soil retain moisture. Eaten together, these three foods are also highly nutritious and complementary, giving you all your amino acids, many vitamins and fiber. In the 1980’s Manitoba Museum archaeologist Leigh Syms (now retired) discovered seeds of corn in storage chambers near Lockport and Snyder, evidence of pre-European agriculture in Manitoba. Eventually “new world” food crops spread to other continents after Europeans reached America and are now being grown all over the globe. In fact, one is hard pressed to find a type of cuisine that hasn’t been impacted by American food plants. Ukrainians weren’t stuffing their perogies with potatoes before 1,500 AD. Italians didn’t have any pizza or marinara sauce before then either as tomatoes are also a “new world” crop. And spicy Thai curries that rely on peanuts and hot peppers were also non-existent; both plants are native to Mexico. Desserts were also pretty boring before 1492 since the indigenous peoples of Central America discovered two of the most popular flavorings: chocolate and vanilla.


Image: Museum specimen of American Chestnut.

A small pile of brown cocoa nibs on a black backdrop.

Cocoa nibs from the Museum’s botany collection.

A Museum exhibit  with three sides and benches for seating to engage and read material.

First Farmers exhibit in the Museum’s Grasslands Gallery.

An examination of the history of agriculture and world cuisine reminds us that culture, far from being static, is constantly in flux. So the next time you encounter a foreigner who asks about Canadian culture mention the significance of the Thanksgiving dinner and all of the cultures whose world cuisines were forever changed by the plants of this continent and the First Nations who began cultivating them. Happy Thanksgiving!

Dr. Diana Bizecki Robson

Dr. Diana Bizecki Robson

Curator of Botany

Dr. Bizecki Robson obtained a Master’s Degree in Plant Ecology at the University of Saskatchewan studying rare plants of the mixed grass prairies. After working as an environmental consultant and sessional lecturer…
Meet Dr. Bizecki Robson