Close-up of a swirled Maclurina manitobensis fossil in a rock.
August 25, 2015

Left Behind in Airport Cove

Left Behind in Airport Cove 

By Dr. Graham Young, past Curator of Palaeontology & Geology


If you think about how Museum paleontologists get fossils, you might guess that we go out and find where the fossils are, extract all of them from the rock and sediment, and return them to the Museum. Certainly that is what we do where fossils are scarce, but in many instances our job really consists of deciding what to leave behind. Our specialists at the Manitoba Museum are called curators, and a curator by definition has to be able to select what is needed for collections and exhibits. 

Photo looking out over a rock landscape with low pools of water. A group of indviduals are scattered around looking at the rocks

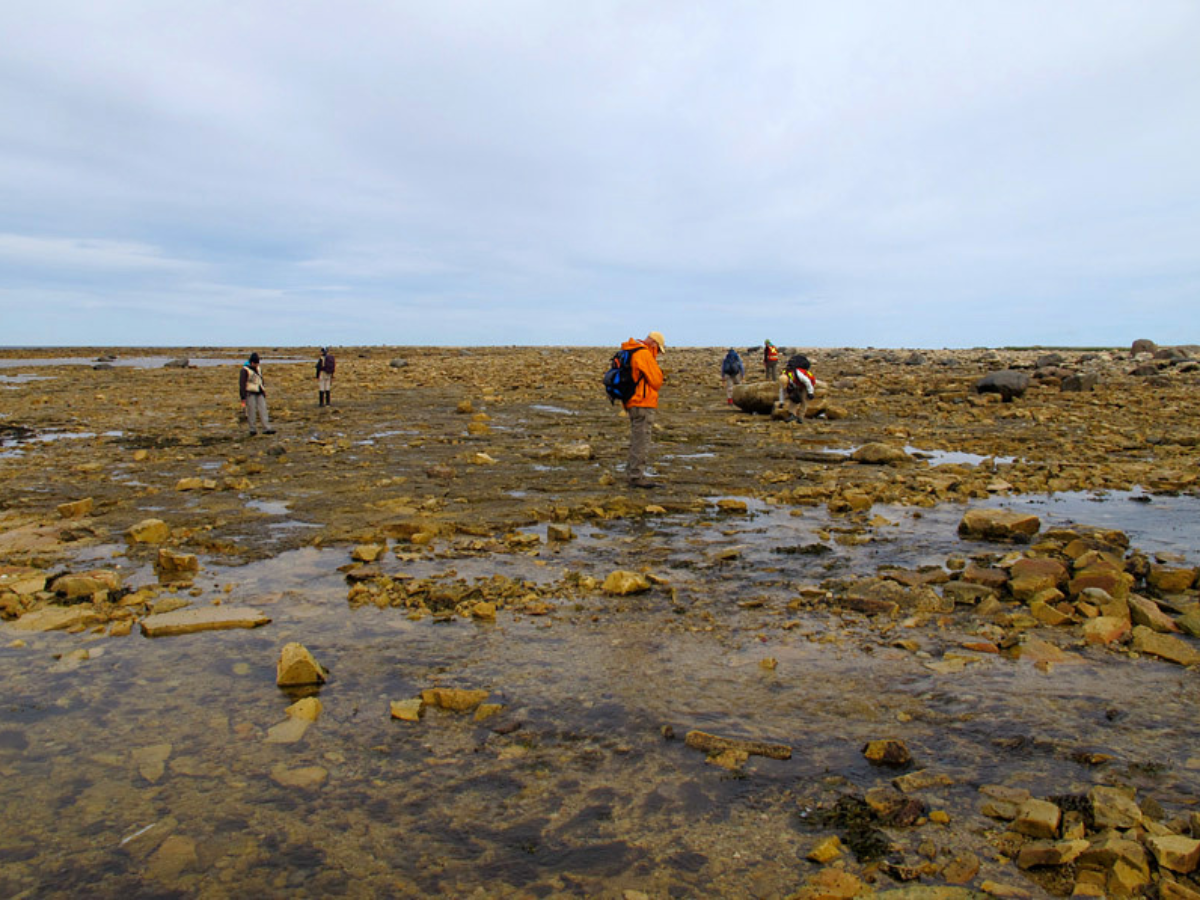
Our field group, walking across dolostone beds in the Silurian part of the cove.  

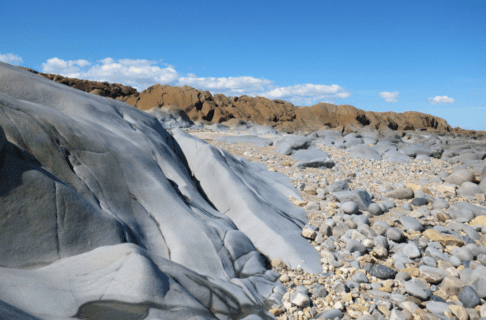
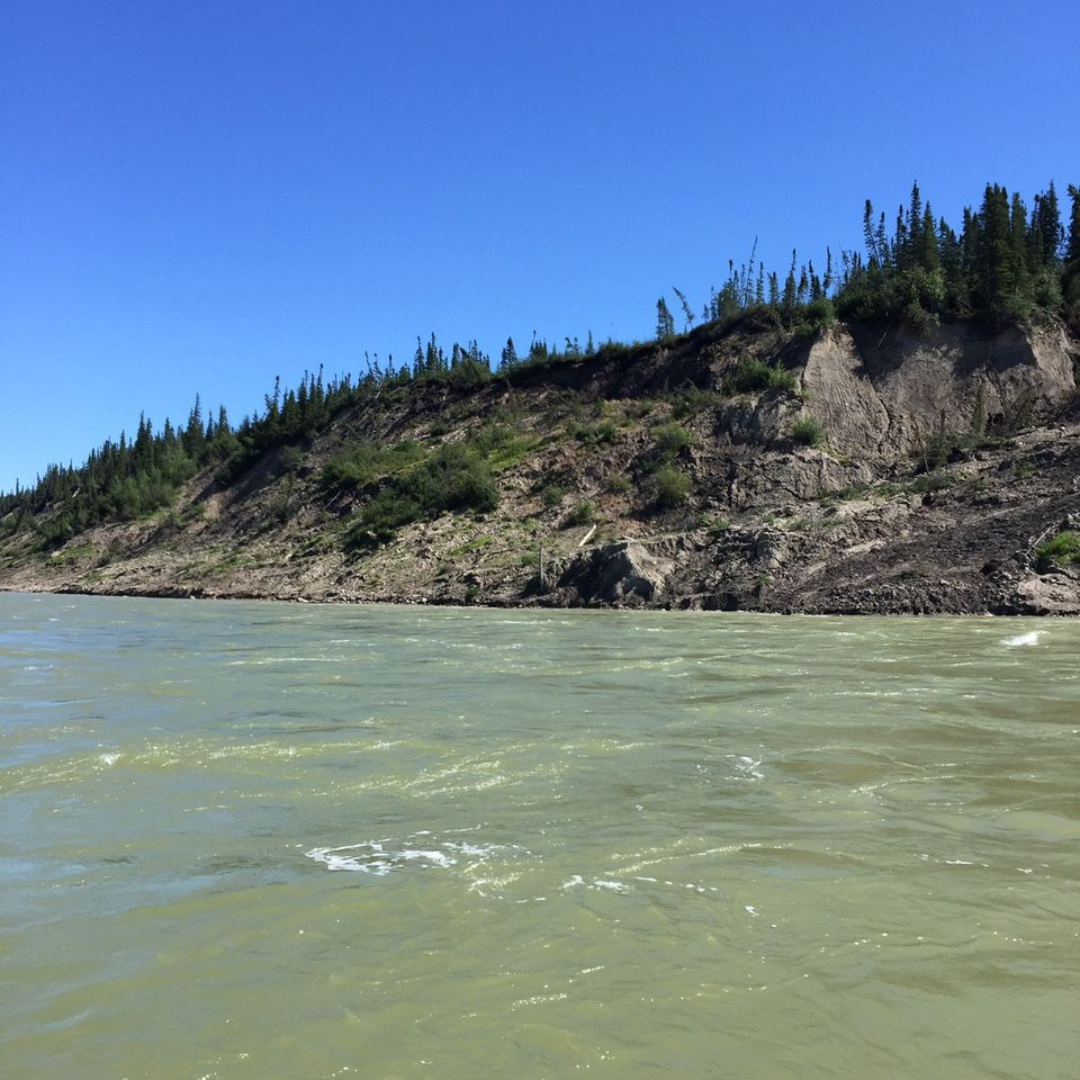
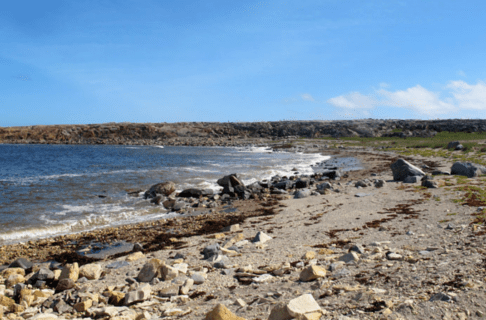
This fact was really brought home to me in the past couple of weeks, as we revisited sites in Airport Cove, the stretch of shoreline north of the airport at Churchill. Airport Cove covers a large area, with many patches of bedrock spread across the shoreline. These patches of rock allow us to sample many different sedimentary beds from the end of the Ordovician Period and the beginning of the Silurian Period, roughly 445-435 million years ago. 

Landscape view over a rocky stretch of ground leading to the open water in the distance.

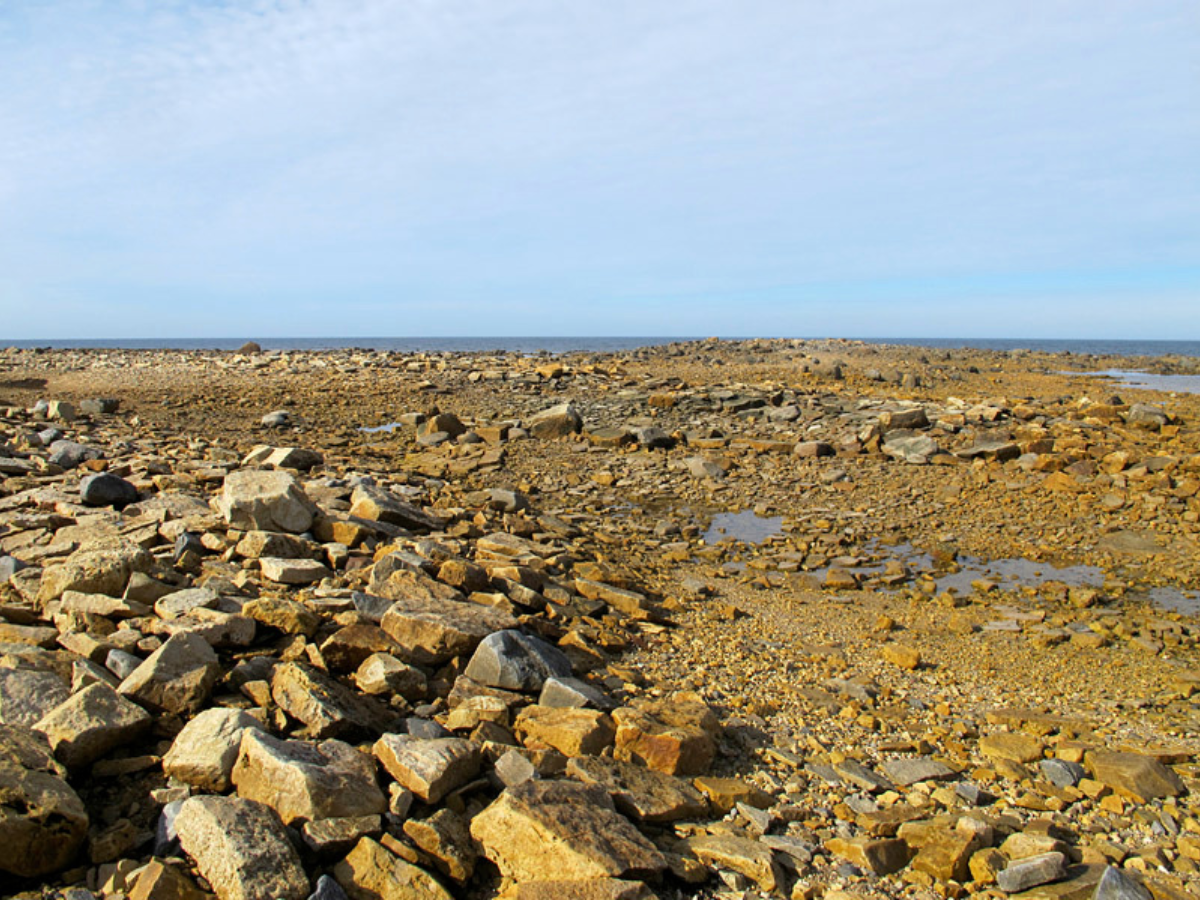
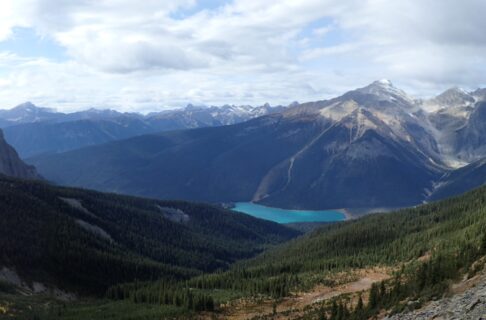
In the cove, the rock seems to go on almost forever. 

The rocks in the cove were deposited as sediment in warm tropical seas, so fossils are plentiful in many of them. With such an embarrassment of riches we have to be selective every time we go out in the cove; if I collected every decent fossil, we would need an entire freight train to get them to Winnipeg!  And then, where could we possibly store them? 

Close-up on rock surface with two shell fossils embedded in it. A size scale card is placed in frame along the bottom.

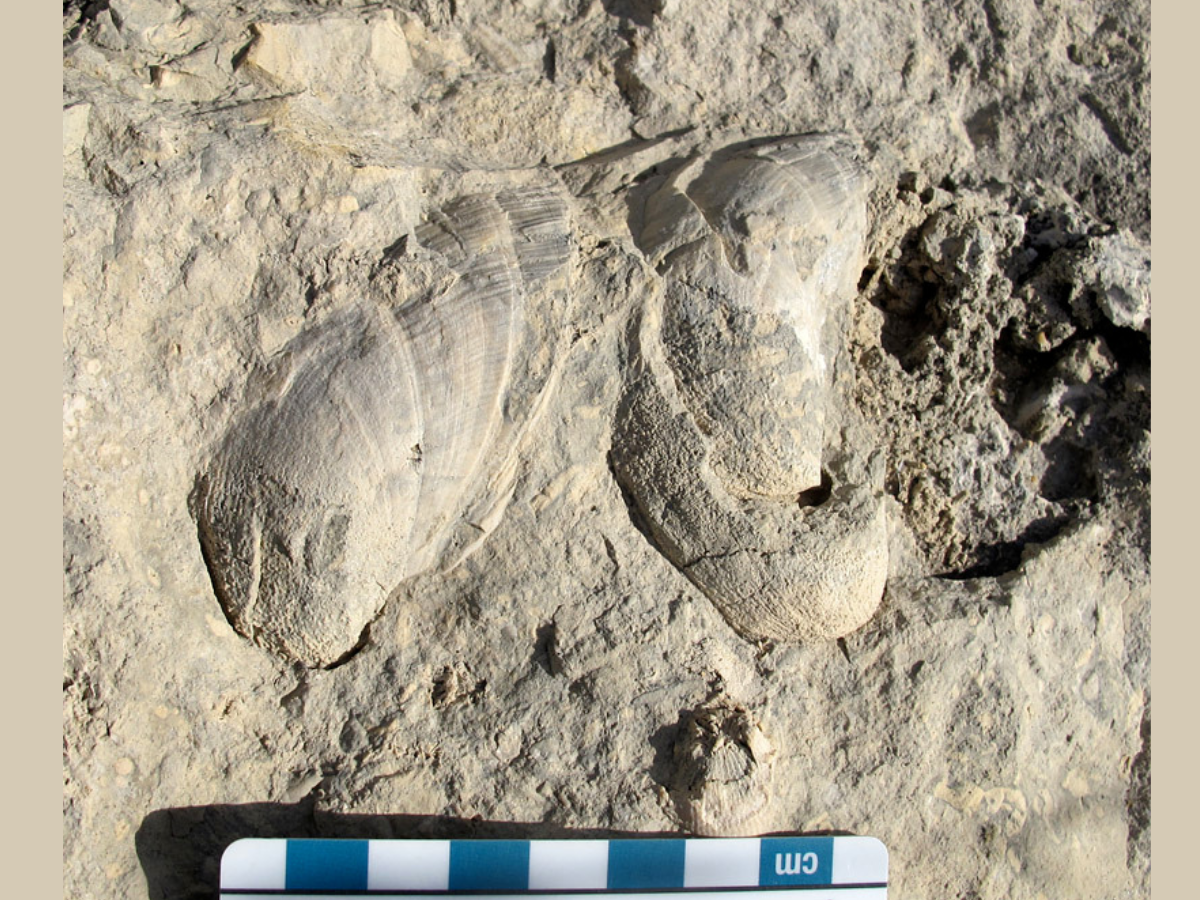
Two examples of the large Silurian brachiopod (lamp shell) Virgiana decussata.

As a result of our previous work here, many examples of the “standard” fossils from Airport Cove are already resident in the Museum’s collections, and this time we were looking for very specific and rare things. So we would walk around the cove each day, considering and photographing the more common sorts of fossils. Some of these are old friends, on blocks of stone that I can remember being in the same place ten or fifteen years ago. Others were new to me, but I can hope to see them again if I get back here. And then there are the few fossils that are so good that they must go to the Museum; one of these is shown at the end of this piece. 

Close-up photo of a section of rock with many small fossil pieces embedded in it. A size scale card is placed in frame along the top.

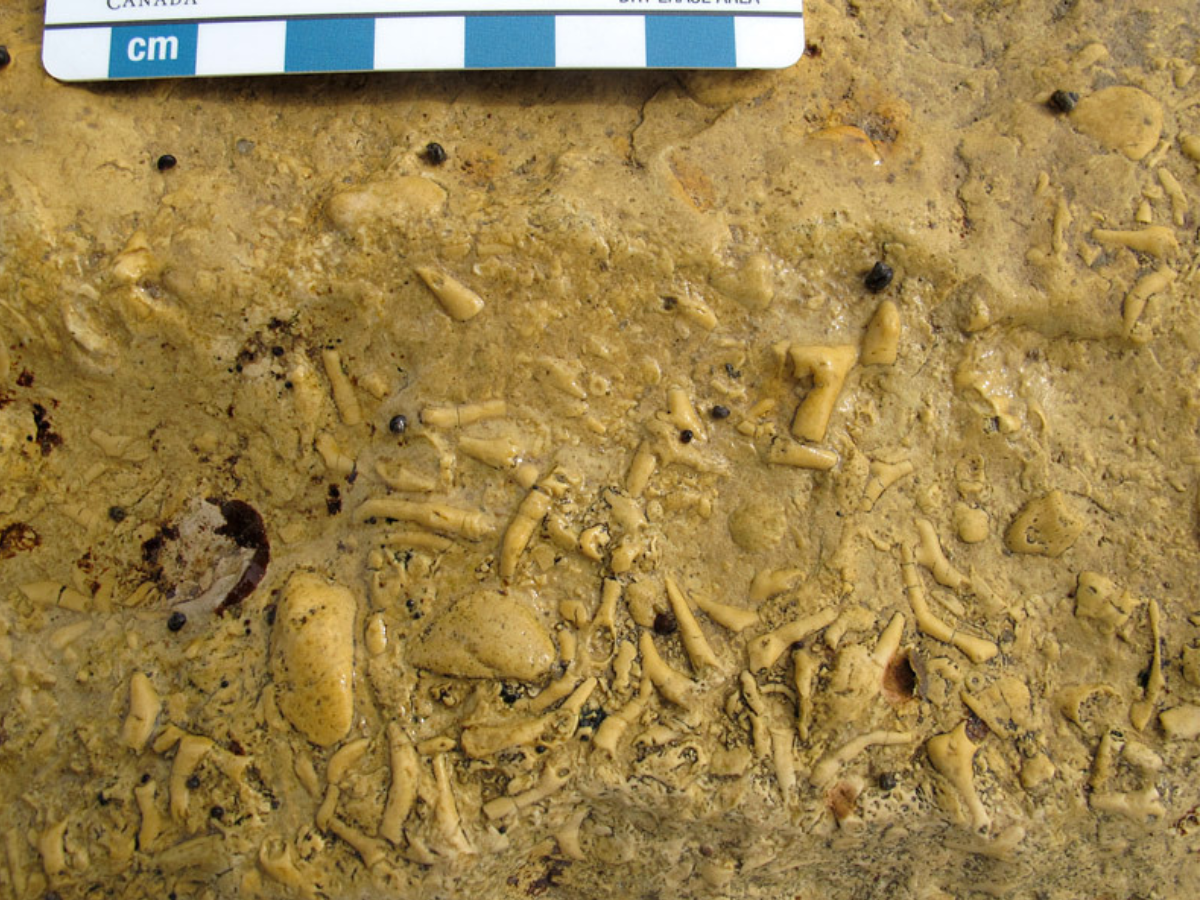
Abundant pieces of auloporids, Silurian “organ pipe” corals, in a dolostone bed low in the modern intertidal zone.

If you are ever in the Churchill area and wish to go looking for fossils, please follow all  guidelines on polar bear safety! We had to leave our work area at Airport Cove twice last week as there were bears nearby, and on one occasion a mother and cub walked right through our site very shortly after we got into the truck. 

Photograph of a section of rock with an elongated tube-shaped fossil in the surface. A size scale card is placed on the rock beside the fossil.

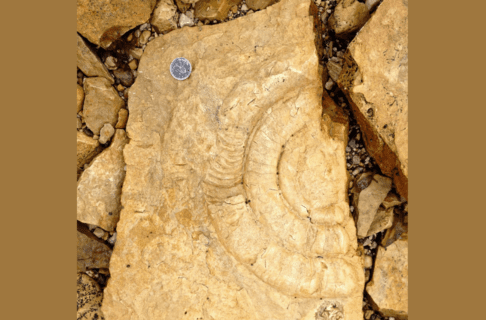
Old friends: we have been walking past this block of Ordovician stone for the past fifteen years or more. The elongate fossil on the left is the central tube (siphuncle) of a nautiloid cephalopod, while that on the right is an tall aulacerid stromatoporoid (sponge). 

Close-up photo of a section of rock with a curved U shaped fossil in the surface. A size scale card is placed in frame along the top.

The pygidium (tail) of the Ordovician trilobite Isotelus.

Close-up photo of a section of rock with dark lichens growing on the surface. Two fossils are embedded in the rock, on round and swirled, the other rounded on one side. A size scale card is placed in frame along the left edge.

Another example of the gastropod Maclurina manitobensis (lower), with an unidentified fossil that might be a stromatoporoid sponge.

A section of rock with half of a round, swirled fossil embedded in it. A quarter is placed on the rock’s surface for scale.

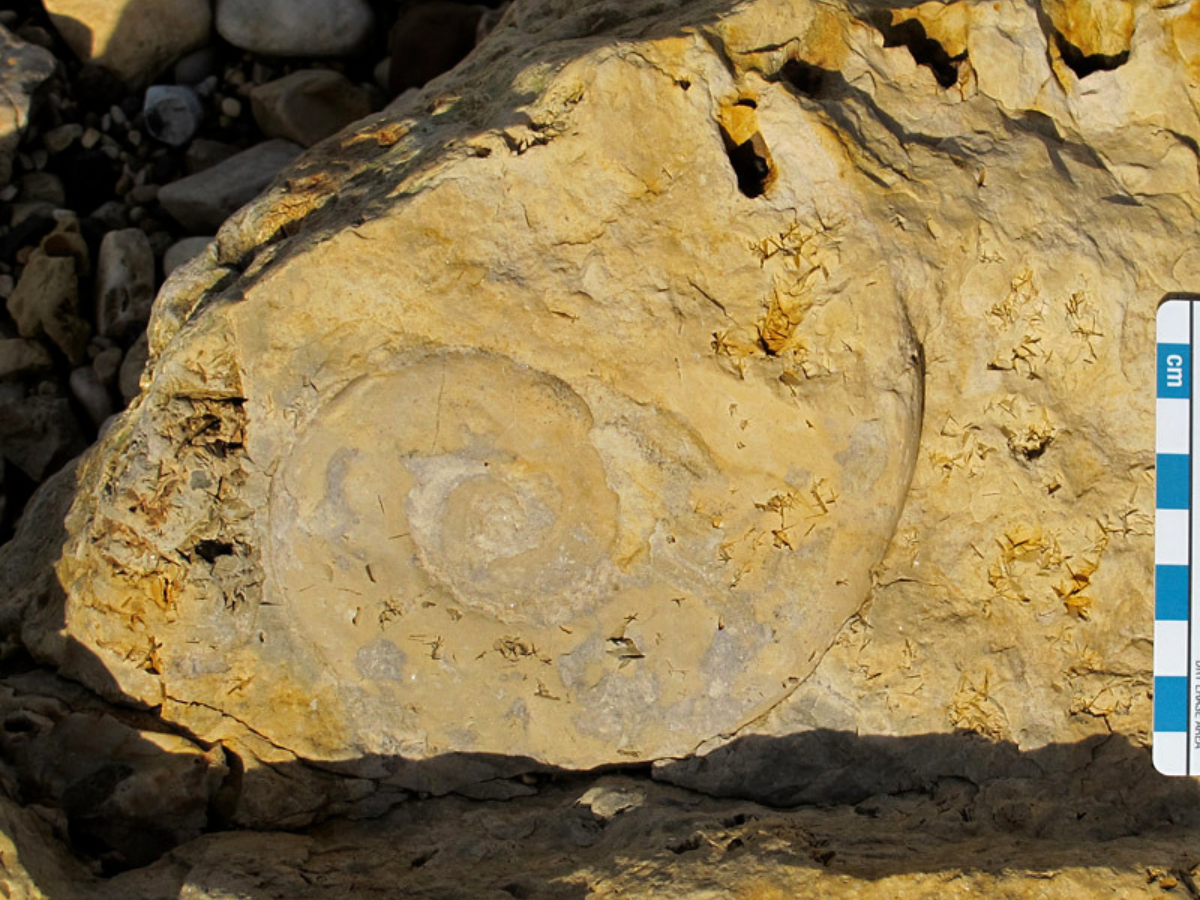
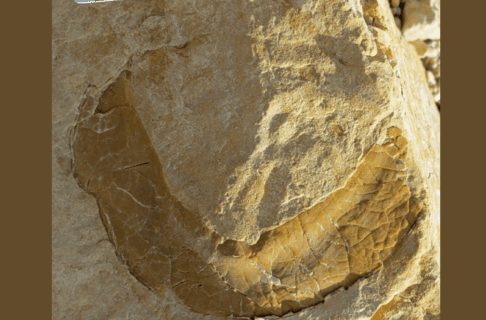
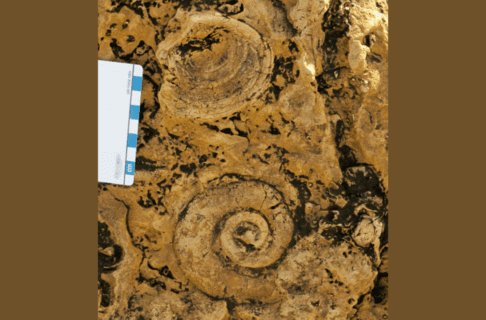
The one we couldn’t leave behind: this beautiful Ordovician coiled nautiloid cephalopod is now in transit to Winnipeg, along with the other fossils we collected. 

Landscape photograph looking out over a rocky shoreline at the water’s edge.

The end of the cove.

Northern Exposure – Part 4 (Cataloguing)

Guest blog by Jacinda Sinclair, contract Cataloguer and long-time TMM volunteer.


In Northern Exposure Parts 1-3, Amelia wrote about her experiences excavating. Now I’m going to cover what happened to her artifacts once she got them back to the Museum.

Cataloguing is a 7 step process.

Step 1 is sorting. To start, I order the artifacts by matching them to the field records made by Amelia’s team. Artifacts found in the same excavation unit are always grouped together.

Step 2 is cleaning. A bucket of plain water and an old toothbrush is usually the way to go.

A spread pile of record sheets with the Government of Manitoba logo on them next to some paper bags, labelled with basic identification details.

Step 1, Sorting: Matching field-bagged artifacts to their record sheets. Sometimes figuring out what goes where can be tricky.

A blue rubber basin with a shallow amount of water covering the bottom, and a toothbrush laid along the upper side.

Step 2, Cleaning: I wouldn’t want to brush my teeth like this, but it’s just fine for artifacts.

A sheet of paper containing columns of catalogue numbers, with a cutting tool, tweezers, small paintbrush, and a jar of sealant placed on top.

Step 3 is identification. This is the hard one. I need to figure out what each artifact is as well as any other information I can gather about how and when they were made. So how do I figure this out? I use a combination of resources: reference books, websites, and the Museum’s own comparative reference collection. This information is entered into a computer database. I also add excavation information from the field notes. The computer assigns each artifact its catalogue number and prints catalogue cards.

Step 4 is labeling. I use a special sealant to glue acid-free labels onto artifacts.


Image: Step 4, Labeling: Labeling tools. Until recently, labels were written onto artifacts using fountain pens. It was harder to do and even harder to read.

Step 5 is photography. Photos create an extra record for the assemblage making it easier for archaeologists to do research. Typically not all artifacts are photographed, but if done correctly, anyone looking at the pictures will have a good idea of what the site was like.

Step 6 is conservation. Damaged (rusty) artifacts need special treatment to protect them from further damage. While I might identify which artifacts need conservation, the Museum has a specialist who does the work during this step. The coolest thing about conservation is that sometimes details like maker’s marks are only visible after rust is removed.

Step 7 is storage. Each artifact gets put in a plastic bag with its catalogue card. Everything is filed and placed in climate-controlled storage.

A circular artifact propped up with supports on a surface covered in a grey fabric. A camera is positioned directly above, looking down at the artifact.

Step 5, Photography: Photographs need to be taken from many angles. Getting things into position can be tricky.

Two photos side by side. On the left is a photo of a rusted fish hook. On the right is a close up at one end of the hook where a possible maker mark is mostly concealed by rust.

Step 6, Conservation: Is there the outline of a maker mark on this fishhook? We won’t know for sure until after conservation.

A thin white artifact in a plastic sleeve with an catalogue card identifying is as part of the stem of a pipe. The plastic sleeve is placed on the top of a box filled with similar sleeves.

Step 7, Storage: The end product ready for storage.

That’s cataloguing! Some of the steps sound kind of fussy and boring, but I’m someone who likes to be moving and doing something (even when I’m watching TV), so actually the whole process is pretty relaxing. I love how sites from the same time period and/or area can turn out to be really different from each other. Finding out how each site is unique is the best part of cataloguing.

Broken pieces of pipe stems are common at fur trade sites and don’t usually get as much attention as bowls and spurs, but it’s really impressive to see a complete stem laid out.

Journey to York Factory

My last stint of fieldwork this summer had me checking off a box on my bucket list, I finally made it to York Factory! Why did I want to go there so badly? Well, not only is it one of the most important Hudson’s Bay Company sites, it was also the entry-point for early immigration to our province and beyond, I knew I had to see if for myself.

In partnership with Parks Canada, York Factory’s current custodians as it is now a National Historic Site, Kevin Brownlee and I set out with a fantastic videography duo (Kevin and Chris Nikkel) from Five Door Films to try and capture the essence of the site and bring it back for our Museum visitors.

York Factory is located near the mouth of the Hayes River, it’s not the most convenient location for most Manitobans or tourists to visit. That said, the site and surrounding environment is INCREDIBLE so if you ever have the chance to travel up that way, jump on it!

A map of Manitoban with a rectangle placed over a portion in the north east near Hudson Bay.

Map of Manitoba showing area of our journey (Map adapted from Google Earth).

A close up on the portion of the map marked off in the previous photo, showing the Nelson and Hayes rivers.

A close up of the Nelson and Hayes rivers (Map adapted from Google Earth).

Our journey to the site was just as amazing as the site itself, we opted to travel by boat so we arranged our trip with Clint from Nelson River Adventures. Clint was incredibly helpful with the planning and logistics, and he even arranged our transportation from the Gillam airport to his boat launch.

The Nelson River was very scenic, we went through some rapids, saw eagles flying overhead, and made a quick stop on Gillam Island to inspect a plaque in honour of Thomas Button (the first European to set foot in Manitoba in 1612, and the one to give the Nelson River its name).

Three individuals standing to the side of a dirt road, on which a large truck is pulling a trailer with a motor boat on it.

Nelson River Adventures has a pretty sweet set-up to take folks out to York Factory.

A rocky, treed bank increasing in incline, along a cloudy river.

The Nelson River is stunning.

A plaque with a short biography of Sir Thomas Button written in English, French and Inuktitut.

Plaque on Gillam Island in honour of Thomas Button.

As we came to the mouth of the Nelson a bank of fog rolled in, making old Port Nelson look extra creepy. In 1912 the Canadian Government had selected this site over Churchill for their port on Hudson Bay and planned to link it with the Hudson Bay Railway. There were many reasons why this attempt was unsuccessful (too many for this post!) resulting in the abandonment of the site in 1918. Now all that remains is a wrecked dredging ship, and the truss bridge out to a man-made island.

The fog persisted as we emerged into Hudson Bay, and the sea was angry! It was just as I imagined the Bay to be, I would have been disappointed if it was smooth and calm. The boat has to swing out wide into the bay to avoid the shallows of Marsh Point between the Nelson and Hayes rivers. Clint deftly handled the waves while we enjoyed the bumpy ride.

Part of a wrecked dredging ship emerging from choppy water beneath a grey sky.

Wrecked dredge at Port Nelson.

Two smiling individuals, both wearing baseball caps and sunglasses, posing on the deck of a boat for the photo.

Our Captain Clint with First Mate Grizz.

Eventually we made our way around the point and down into the Hayes. Claude and Kyle (Parks Canada site manager and summer student) were waiting for us at the dock and helped us unload all of our gear. We’d made it, and while the journey itself was exciting, we were in for a lot more during our week-long stay!

View across a stretch of grass and bush towards a large three-storeyed building beneath a blue sky with occasional white clouds.

After climbing up the steep steps from the dock this is the view I was greeted with! The Depot is in the foreground and the Parks Canada staff house in the distance.

Dr. Amelia Fay

Dr. Amelia Fay

Curator of Anthropology & the HBC Museum Collection

Amelia Fay is Curator of Anthropology and the HBC Museum Collection at the Manitoba Museum. She received her BA in Anthropology from the University of Manitoba (2004), an MA in Archaeology…
Meet Dr. Amelia Fay

Perseid Meteor Shower in progress!

Every August, our planet passes through a giant dust bunny in space. The dust comes from Comet Swift-Tuttle, a “dirty snowball” that orbits the sun in an oval path. The comet itself is not terribly impressive, but it leaves so much dust in our Earth’s path that the Earth spends several days sweeping up millions of dust particles like a planetary broom. Each piece of dust hits the earth’s atmosphere at incredible speeds, and friction with the air causes the dust to vaporize in a flash of light at altitudes of dozens of kilometers. All the way down here on the ground, we can see each speck of dust’s death throes as a “falling star” or “shooting star”. Astronomers prefer the correct term: “meteor”.

There are actually meteors hitting Earth all the time. On any clear night, if you watch the sky carefully you’ll see a few. Under perfect dark conditions, you can expect 5-10 meteors per hour on just about any night, caused by the random dust particles floating around the solar system. In August, though, Earth hits that dust bunny, and we see many more meteors – a meteor shower. Despite the name, the sky doesn’t fill with shooting stars; you may see one every minute or two, though.

The Perseids are just one of a dozen or more annual meteor showers which are visible. Named for the constellation of Perseus, where they appear to radiate from, the Perseids are the best-known meteor shower because they occur in August, when sitting outside all night in a field is survivable. If you want to get technical, the Geminids of December are a better event, but Manitobans certainly recognize the challenges involved in observing them without losing fingers and toes to frostbite.

Observing the Perseids: Meteor showers are the ultimate low-tech observing event. You don’t need a telescope or even binoculars; your main piece of gear is a reclining lawn chair or blanket. You want to get away from city lights if you can – street lights will make it harder to see the fainter meteors, and really cut down on the number you see. Face the darkest part of the sky, and just look up and watch the stars. Every so often, you will see a meteor streak by.

The shower is active now, but it’s a slow build-up. The peak is on the early morning of August 13th, but you should see meteors for several days before and after that. Meteor showers like the Perseids are always best after midnight – you might not see many in the evening hours. This year, the moon is New on the 14th, and so won’t drown out the meteors with its light.

Scott Young

Scott Young

Planetarium Astronomer

Scott is the Planetarium Astronomer at the Manitoba Museum, developing astronomy and science programs. He has been an informal science educator for thirty years, working in the planetarium and science centre field both at The Manitoba Museum and also at the Alice G. Wallace Planetarium in Fitchburg, Massachusetts. Scott is an active amateur astronomer and a past-President of the Royal Astronomical Society of Canada.

Fescue Findings

As I near the end of my two years of pollinator research in the fescue prairie, I’ve been wondering what it all means. In particular I’ve been thinking about how the pollinator communities in fescue prairies are different than in the tall grass prairies. Here are the patterns that seem to be emerging:

1. Bees are more important pollinators in fescue prairie than flies.

When most people think of pollinators they usually think of bees and butterflies. One of the things I discovered is that flies seem to be more common pollinators than bees in the tall-grass prairie and the reverse true in the fescue prairie. Why is this so? I suspect that it is because tall-grass prairies are in general moister. Many bee species nest underground and if the soil is saturated with water they may not be able to breed successfully. Flies on the other hand breed in a wider variety of habitats (many even have parasitic larvae) and are less affected by moist soils. In fact, fly species that breed in water would benefit from moist conditions.

A bumblebee at a cone-shaped cluster of white flowers.

A bumble bee (Bombus) on a field locoweed plant (Oxytropis campestris).

A yellow flower with a small, slender yellow and black Syrphid fly near the centre.

Image: Syrphid flies prefer regular flowers like this sunflower (Helianthus).

2. The dominant pollinators may affect plant community composition.

Close up on the top of a breadroot plant where there is a cluster of small white to blue, pea-shaped flowers.

Irregular flowers were more abundant on the fescue prairie, comprising about a third of all insect-pollinated plant species. Further, a greater percentage of visits (~27%) were to the irregular flowers on the fescue prairie. In tall grass prairie, irregularly flowered plants comprise only about a quarter of all species and receive less than 3% of all insect visits. Irregular flowers, particularly those with long floral tubes, are attractive to long-tongued bees and butterflies. Regular flowers with short or no floral tubes are preferred by small bees and flies, which typically (although not always) have shorter tongues. Thus the pollinator community appears to be influencing the composition of the plant community by preferentially fertilizing irregular flowers.


Image: The irregular flowers of this breadroot (Pediomelum esculentum) plant are attractive to bees.

3. Insect activity was lower in the spring on fescue prairies than on tall grass prairie.

Close up on a pink flower of a Prickly wild rose.

Bees were more abundant pollinators in the fescue prairie than flies. However in the spring their populations are still small as only the queen bees are out foraging. Bee populations reach their peak in late summer when worker bees are busy collecting nectar and pollen. In contrast, pollinator visits were much higher in the tall grass prairie in spring due to large populations of overwintering flies that hatched once it warmed up.


Image: This prickly rose (Rosa acicularis) is visited by flies and small bees.

4. Grazing can alter pollinator activity.

When comparing the pollinator visitation rate between grazed and ungrazed plots over the whole year there was no difference except with respect to timing. The grazed fescue prairie plots had more flowers in spring and early summer and subsequently more insect visitation at those times. In contrast, ungrazed plots produced more flowers in late summer and fall, and experienced more visitations at this time of the year. This suggests that the ideal land management might be a combination of grazing and rest so that a maximum diversity of flowers are available to the pollinator community over the year.

Dr. Diana Bizecki Robson

Dr. Diana Bizecki Robson

Curator of Botany

Dr. Bizecki Robson obtained a Master’s Degree in Plant Ecology at the University of Saskatchewan studying rare plants of the mixed grass prairies. After working as an environmental consultant and sessional lecturer…
Meet Dr. Bizecki Robson