Amethyst Update

Amethyst Update

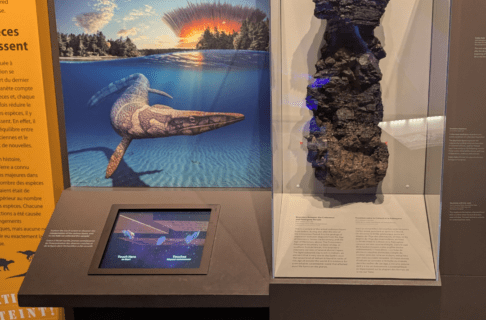
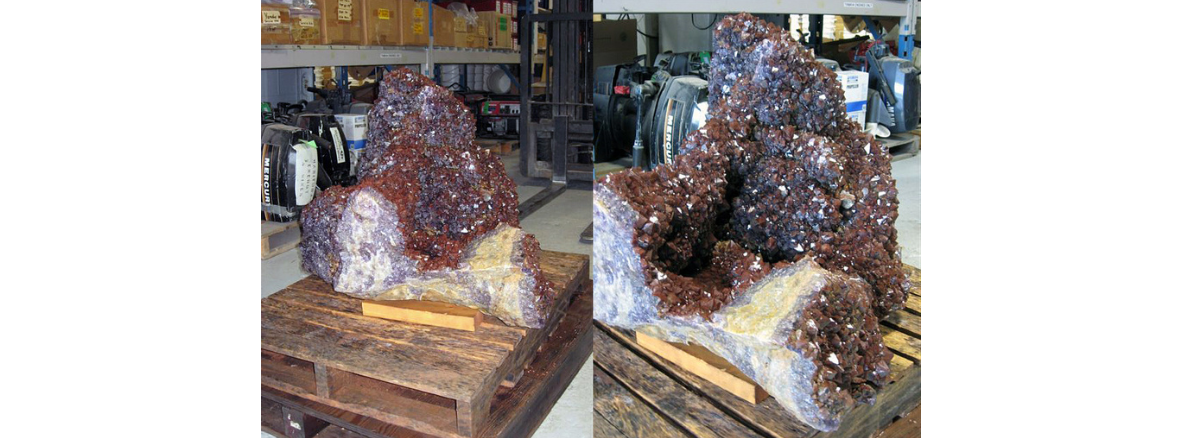
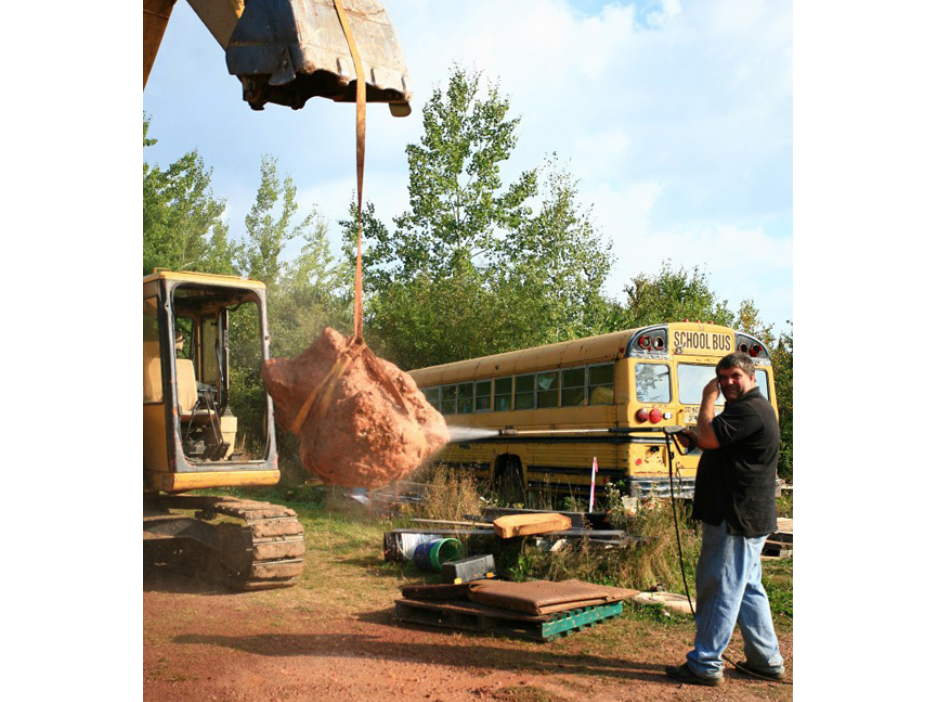
The amethyst exhibit in the foyer was installed today, on schedule. There were a few teething pains, mostly related to lighting, but when you have done many exhibits you know that you will never be finished without some sort of issue.

The last 5% of the installation work always takes 50% of the time. As a public space, the foyer has a lot of ambient light, which means that there is an immense amount of reflection on a plexiglass case lid. When we put the lid on, we realized that we would not be able to read some of the text. So the lid came off, the backing panel was offset a bit to the side, some flat black board was placed inside the back of the lid, and the lights were moved around and adjusted a couple of times more.

A large amethyst in a plexiglass display case in front of a large information panel.

A large amethyst in a plexiglass display case in front of a large information panel.

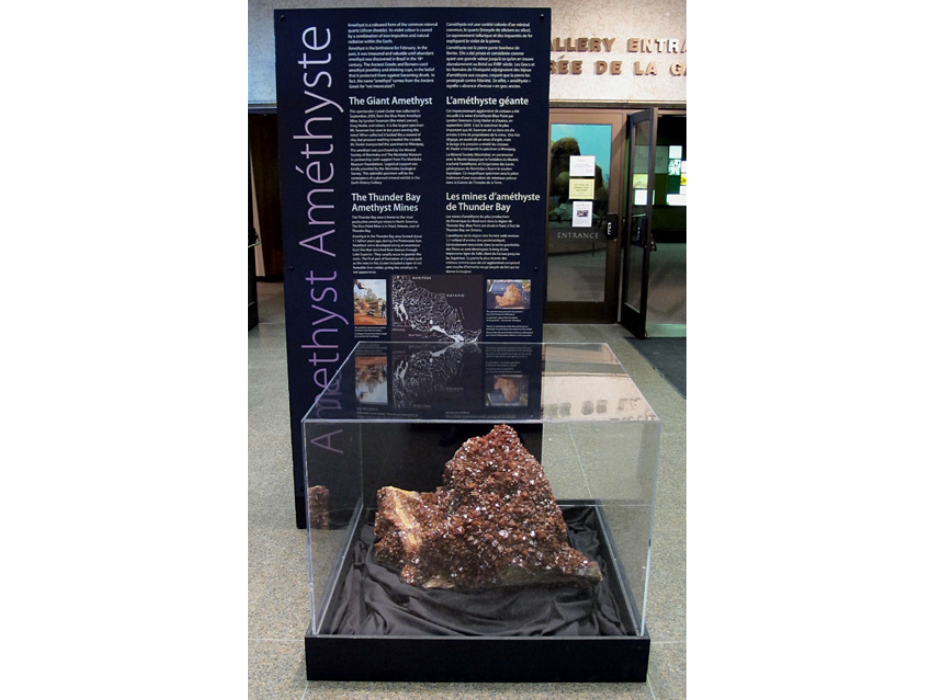
Voilà, the exhibit is done, and we are very pleased with the result. MANY thanks to David, Hanna, Janis, Cindi, Adèle, Bob, Bert, Paul, Sean, and everyone else for their efforts.  Even a simple exhibit such as this one requires the work of many people!

A.M.E.T.H.Y.S.T.

By Dr. Graham Young, past Curator of Palaeontology & Geology


For the past several years, I have been working with the Mineral Society of Manitoba to develop a mineral exhibit at the Museum. This partnership has been a wonderfully positive one; among other achievements the Society has donated to us a gorgeous selenite (gypsum) cluster from the Winnipeg Floodway, which I hope to show you on this page at some point.

So it was not a total surprise when in the fall of 2009, I received a call from my geologist colleague John Biczok (who is also president of the Mineral Society), telling me that they had found another superb specimen for us.  The gist of his call was that,

“We have the biggest amethyst cluster I have ever seen, and it is in the back of a truck. Greg Hasler has just pulled it out of the Thunder Bay amethyst mines and it has mud all over it. Where can we deliver it at the Museum, so that we can clean it up?”

Two photos, side-by-side, of different angles of a large amethyst on a wooden pallet.

This spectacular crystal cluster was collected in September, 2009, from the Blue Point Amethyst Mine, by Lyndon Swanson, Greg Hasler, and others. It is the largest specimen Mr. Swanson has seen in ten years owning this mine! (photos: Gerry Benger, Manitoba Geological Survey).

Further discussion revealed that this was a piece that covered an entire shipping pallet, and might weigh something toward half a tonne! Now you have to appreciate that, at the Museum, we don’t have immense space available to lay things out, let alone places where we can readily pressure wash the mud from a half-tonne boulder. This specimen was arriving in Winnipeg, and it needed to be taken off the truck and put somewhere secure. Of course it was not only huge, but it was potentially beautiful and we didn’t want to see it damaged.

I was at a loss for a few minutes, wondering (for instance) if my family would mind having a giant muddy boulder temporarily stored in our garage. I surmised that they might. But then I thought of my friends at the Manitoba Geological Survey, with whom we have collaborated on several projects. A couple of calls later, and we had permission to have the amethyst delivered to the Survey’s core facility in the western part of the city. Not only would the Survey let the Mineral Society unload and wash the specimen in their yard, but they would then use their forklift to move the cleaned amethyst to a safe place inside the building.

A large boulder suspended by the scoop of a bulldozer as a person pressure washes it.

The amethyst was pressure washed at the mine, after extraction from the ground. The Thunder Bay area is home to the most productive amethyst mines in North America. (photo: Cindy Hasler).

A large reddish boulder in the back of a pick-up truck.

The amethyst rests in the back of Greg Hasler’s truck, awaiting transport to Winnipeg. (photo: Cindy Hasler).

And there it sat for the winter, occasionally visited by people from the Mineral Society and Museum, and admired and photographed by Survey staff and visiting geologists. It was truly a wonderful, spectacular piece. The Museum partnered with the Mineral Society to purchase the amethyst for our collections, with a view to putting it on exhibit in the Earth History Gallery. In the early summer last year Janis Klapecki and I carefully bundled the beautiful crystals in layer upon layer of foam padding, and it was shipped over to the Museum back rooms, where it has sat for almost another year.

Now, finally, we will have our first opportunity to share it with visitors, through a temporary exhibit in the New Acquisitions Case in the Museum foyer. This will open to the public on May 10; I am really looking forward to their reaction!

From the Deep Files …

When I started to work at The Manitoba Museum in 1993, I discovered this intriguing correspondence in the “deep files,” inherited from the old Manitoba Museum:


Altamont, Man.
September, 1963

Dear Sir:

Today I was digging a hole along the edge of a slough. After digging through four feet of peat, I came upon this tooth. Two inches below the tooth was a thin layer of white sand.

Could you tell me what kind of animal this tooth is from?

Thank you for the information.

[signature]


There is a sketch of a squarish tooth in pencil on the letter, and a note that it was a “very dark brown specimen.” It looks like a bison tooth to me, and apparently the Museum staff wrote back to that effect. They must have also expressed an interest in visiting the site, as indicated by the second letter:


Altamont, Man.
September, 1963

Dear Sir:

I received your letter concerning the tooth.

The hole which I found the tooth in was dug to bury a fairly large pig. The hole was about 4 1/2 feet deep, the tooth was about 4 feet from the surface. … I found the tooth along the side of the hole, I dug around the tooth but there was no sign of any other tooth or bone of any kind. After a good look for others, we buried the pig in the hole and filled it in.

You are welcome to come to investigate any time, if you still wish to under these circumstances.

Sincerely,

[signature]


There is no note in the file on whether Museum staff visited the site. One suspects that they were not able to find the time to do so.

The Birch Bark Canoe: Step 1

By Kevin Brownlee, past Curator of Archaeology


The best way to understand any skill or expertise is by trying it out. Experimental archaeology attempts to replicate past activities to improve our understanding and interpretation of archaeological material. My interest in experimental archaeology is broad since I am interested in all aspects of past technology, working stone, clay, bone, antler, wood, bark, and hides.

In some cases I am replicating tools that I have recovered or items from the collection in other cases I am learning from Elders and knowledgeable community members on traditional activities. I have learned how to tan hides and make birch bark baskets from the First Nation community members. In other cases I have learned on my own how to make bone and antler tools. Here are a few pictures when I used a replica antler pick (not original) to see if it would chop through lake ice at -30.

An individual wearing full winter wear, kneeling on a snowy outcropping. They hold a long stick, pick type impliment.

Experimental archaeology using antler pick.

An individual kneeling over a whole cut into deep ice, and reaching in with a stick-like tool.

Experimental archaeology chopping hole in ice.

Close up on two mitted hands holding chunks of ice, and the tip of a white antler tool.

Results of chopping hole in lake ice with tool.

This past August my wife Myra and I were taught how to make a birch bark canoe by Jim Jones Jr. and Grant Goltz who are colleagues of ours in Minnesota. Jim Jones Jr. is an Ojibway Archaeologist and member of the Leech Lake Band working for the Minnesota Indian Affairs Council. Grant Goltz is a consulting archaeologist and is a master of many skills and makes traditional First Nation pottery, birch bark canoes, kayaks, furniture, and guitars, to name a few. Grant started making canoes in 1995 when he and his wife Christy taught an archaeology field school. The students learned how to make a canoe during the 6 weeks of the field school and everyone involved gained a better appreciation of this ancient craft. Since then he has made 20 – 30 birch bark canoes. The most famous was 27.5 feet long and was paddled from Portland Oregon to York Factory Manitoba.

Four birchbark canoes laying on braces on a lawn.

Canoes at Grant and Christy’s home.

Two individuals with heads close together seated on either side of a picnic table looking at a book showing styles of canoes.

Planning the canoe.

We began on a warm afternoon on the property of Grant Goltz and Christy Cain. We examined many books on the subject of birch bark canoes in order to decide what kind or shape to make. None of the books that Grant had provided good examples of northern Boreal Forest Cree canoe so we decided to make one that I found esthetically pleasing. It was called an early Algonquian Canoe “from the Ottawa River valley”. We made a few adjustments to the plan making a 15 foot canoe, 38 inches wide at the middle thwart. We also raised the height of the canoe at both the stern and bow and flattened the bottom somewhat following images of model canoes.

A sketch showing the end of a canoe with notes and measurements.

Sketch of canoe.

Sketch of a full canoe with notes and measurements for construction.

As we headed for bed that night Grant told Myra and I to get a good night sleep as we were going to be up early the next morning to gather spruce roots before the heat of the mid day.

An Exhibit with Teeth

By Dr. Graham Young, past Curator of Palaeontology & Geology


The Jaws and Teeth Exhibit, 2007

Since one function of the blog is to focus on our collections, it seems like a good place to occasionally revisit past exhibits, especially those showing items that are normally stored away in the back rooms.

Four skulls of varying sizes on display in a museum case. The lower three are identified as monkey skulls and the upper skull as human.

(Photo by Hans Thater)

A wide-angle view of a museum exhibit displaying a variety of skulls.

(Photo by Hans Thater)

Close-up on a walrus skull in a display case.

This walrus skull was front and centre as you entered the room (photo: Randy Mooi).

I was particularly pleased by the Jaws and Teeth exhibit, which was curated by Randy Mooi and me a few years ago. We combined zoological and paleontological specimens to demonstrate vertebrate anatomy and evolution, with a particular focus on adaptations for eating.

We loved doing this exhibit. To us, it was an opportunity to explore some of the best aspects of the traditional Natural History museum. And the public seemed to thoroughly enjoy it; we would always see family groups in the exhibit, animatedly discussing the various skulls and comparing their similarities. It really showed us that traditional exhibits can still fulfil an important function in the modern museum!

Three large shark jaws on display in a museum case.

This case of shark jaws and teeth highlighted the adaptations of one of the most long-lived vertebrate groups (photo by Hans Thater).

Large set of Tiger Shark jaws on a display mount.

Mounted jaws of the Tiger Shark, Galeocerdo, show how the teeth are continuously replaced like objects on a conveyor belt!

A variety of mammal skulls on display in a glass case.

This case exhibited the diversity of mammal groups, both living and fossil (photo by Hans Thater).

A display comparing the skull of a human to various other mammals including monkeys and beavers.

A human skull is compared to the skulls of other mammals. The beaver skull on the lower right is from an animal that had a displaced jaw, so that the teeth did not meet and wear normally. Its lower right incisor grew continuously until it met the skull! (photo by Hans Thater)

A variety of skulls from commonly recognized animals in a display case.

These are the skulls of familiar creatures such as dog, cat, pig, and pigeon.

The skulls of a variety of carnivorous mammals in a glass display case.

The skulls of carnivorous mammals are of great interest, and merited their own case.

Skulls of a polar bear and a wolf on display mounts.

Skulls of a polar bear (left) and wolf (photo by Randy Mooi).

A display case containing the skulls of a variety of reptiles and birds.

Skulls of a variety of “reptiles” and birds. A modern crocodile is compared to one from the Eocene Epoch, showing how little these creatures have changed in the last 50 million years!

Entry doorway into the Jaws & Teeth exhibit, with a number of display cases visible inside.

(Photo by Hans Thater)

Voyage of Discovery

By Dr. Graham Young, past Curator of Palaeontology & Geology


Last week, I discovered several very exciting fossils. Some of these are unusual, so unusual that they will certainly end up as the subject of future scientific publications. One of them is only the second known specimen, worldwide, of a particular group for the entire Ordovician Period!

But how, you must wonder, did I manage to make these discoveries? Was I out in the -20 degree weather, scraping the snow from the edge of a quarry in the Manitoba Interlake so that I could get at the rock beneath? Was I taking time away from the Museum, collecting fossils beside some calm tropical sea?

No, it was not as romantic as either of those possibilities. I was in one of the best places to find unusual fossils: looking through the microscope in my little research office. You may have heard of those situations when a large museum discovers an unknown dinosaur in its back rooms, stored away in field jackets from some long-past collecting expedition. But what you might not appreciate is that many of the most important fossil discoveries are made in museum collections, not in the field.

Stacks of trays carrying fossils placed around a crowded office.

I had thought about this for a long time, ever since hearing and reading about how Euan Clarkson discovered the conodont animal in a collection in Scotland. Conodonts have been known for over a century as small, fossilized tooth-like structures that are abundant in many rocks from the Paleozoic Era, but until the early 1980s it was not known what they really represented. Euan found the answer when he was looking through drawers full of specimens that had been collected long before from a site near Edinburgh known as the Granton Shrimp Bed. Based on this discovery, he and his colleagues were able to demonstrate that conodonts were eel-shaped fish-like creatures.


Image: In the paleontology lab, trays of fossils await examination under the microscope.

It is much the same here. We might sometimes already have an inkling that we have found something unusual, such as a very ancient horseshoe crab. But it is only when we really study things carefully under a microscope that we are able to make sense of them, to discover what they actually are. And there are times that the finds are, like Euan’s, simply serendipitous. When I first started to work at the Museum, I had to sort through some uncatalogued fossils. One of these looked somewhat like a jellyfish, with the note attached stating that it had been found in a schoolyard in River Heights, Winnipeg.

Close-up of a fossilized horseshoe crab.

Holotype specimen of the horseshoe crab Lunataspis aurora (specimen I-4000A).

Close-up on a fossilized jellyfish specimen.

The jellyfish found in a schoolyard in Winnipeg (specimen I-2555; ca=canals, go=gonads).

Years later, when I really started to study fossil jellyfish, I pulled out that specimen and realized that it wasn’t just a jellyfish. It was actually one of the best-preserved fossil jellies in existence, and I used a photo of it in a paper we wrote reviewing these sorts of fossils. Since it was found in a schoolyard, however, we don’t actually know its bedrock source. I have my hunches about where it came from originally, but we are still hunting for that jellyfish goldmine! So maybe I will make a discovery in the field, too, but if so it will be because we first found a fossil in the Museum’s collection.

Meanwhile, on these winter days, I will be hunched over my microscope whenever time permits. There are so many slabs of rock to be pored over, fossils waiting to be discovered, and time moves on faster and faster …

Motherload!

By Dr. Graham Young, past Curator of Palaeontology & Geology


If we think about it at all, most of us tend to consider dung (poop) as a substance to be gotten rid of, not something to be collected and treasured. And that is the case for at least 99.9% of it, but of course the situation is different when the dung is in fossilized form, and when it comes from giant, long-extinct creatures.

Fossilized dinosaur dung, or coprolites, has been studied for nearly two centuries. Dinosaur coprolites can tell us quite a bit about the diet and physiology of the creatures, and of course they also make interesting “conversation pieces”.

The Museum is fortunate to have a few good coprolites in our collection, but the quality of this collection was greatly enhanced by a recent donation from long-time Community Associate Ed Dobrzanski. Ed gave us, from his personal collection, two superb coprolites that he had purchased from a dealer about 25 years ago. These are both from the Upper Jurassic Morrison Formation of Utah, the 150 million year-old home of famous dinosaur bones such as those of AllosaurusStegosaurusDiplodocus, and  Apatosaurus/Brontosaurus.

A white-bearded gentleman holding up a greyish coprolite with two hands.

Ed Dobrzanski holding the theropod coprolite.

Close-up of a reddish brown coprolite specimen. The rock is lumpy and irregular in shape.

The splendid agatized theropod coprolite (V-3106).

The first coprolite is the dung of a meat-eating theropod, possibly Allosaurus, since it is the most common large theropod found in the Morrison Formation. This example, perhaps rather graphically, carries the shape associated with its original source!

Two close-ups of a coprolite. The upper image shows the exterior of the specimen, lumpy and brownish. The lower image shows the polished interior, predominantly whitish crystal with orangey-red streaks.

The second specimen is from large plant-eating dinosaur, possibly a sauropod such as Apatosaurus. At first glance, it appears to be a very ordinary, concretion-like rock. However, it has been cut and polished, and the internal structure is revealed as a strikingly beautiful series of agatized blobs and whorls.


Image: The sauropod coprolite, with external surface above and cut and polished surface below (V-3105).

Beneath the Streets of Wolseley…

By Dr. Graham Young, past Curator of Palaeontology & Geology


The following is modified from a piece I wrote for the Museum’s newsletter Features, with the addition of several images that would not fit into the print version.

A selection of recovered bones from an excavation including a partial bison skull, a bison mandibles, and two other skeletal bones.

Walking through the streets of Winnipeg, I have sometimes imagined the sediment and rock beneath. First the soil, then the old river deposits, beneath them the lakebed clays of Lake Agassiz, and then layer after layer of ancient limestone extending downward toward the Precambrian Shield.

Although we know all of those things are present, we rarely get to see them unless something is brought to the surface by some lucky coincidence. Each of those lucky coincidences can help us to understand the past that is preserved beneath our feet.


Image: A selection of the bones found at the Ruby Street site (photo: Hans Thater).

In November, 1969, workers were excavating a sewer in the Wolseley area of Winnipeg, near Ruby Street and Palmerston Avenue. At the bottom of a 10.7 metre (35 foot) deep trench, a stiff blue clay was found. Above the clay were sand and gravel containing bison bones, along with clams and pieces of wood.

Tipped off by an anonymous phone call, Dr. George Lammers, the Museum’s first Curator of Geology and Paleontology (and my predecessor in this job), visited the site and collected the fossils. Since then, these unusual pieces have resided in the Museum’s collection, where they have provided much information about Winnipeg’s distant past.

A black and white photograph of workers excavating a sewer in 1969 with shovels and a rail cart.

Crew working on the sewer excavation under Ruby Street.

A black and white photograph of a construction worker in 1969 working on a sewer evacuation.

It looks as though sewer excavation was dirty, unpleasant work forty-one years ago (as I’m sure it still is today).

Some of the wood from deep in the trench was radiocarbon dated at about 7,500 years old (7,490 ± 80 years before the present). The bison parts include a portion of a robust skull, probably of the extinct species Bison antiquus occidentalis. This species, which became extinct about 5,000 to 4,000 years ago, had horns that were significantly larger than those of modern bison. We know that the bones came from more than one bison, because they include two left mandibles (jaw bones).

There are other bones that are probably elk, and it is quite likely that all of the skeletal parts belong to animals that had been broken up by decomposition, water flow and scavengers. One of the most interesting associated pieces is a log that had been gnawed by a beaver!

Handwritten notes on a piece of paper.

This page of field notes above was written by my predecessor as curator, George Lammers, when he first visited the Ruby Street site in November, 1969. If you go looking for this place, please be aware that Erik Nielsen, of the Manitoba Geological Survey, sent me a note in the 1990s suggesting that the actual site was at the corner of Ruby and Palmerston, as the school is on Wolseley, not Westminster.

The age information, together with the sediments and fossils, tells us a lot about prehistoric events in this area. The sand and gravel have features of an ancient river bar, in which the clams lived, and onto which the wood and the bison were deposited. We can imagine a spring flood carrying pieces of wood from oak and larch trees, along with the occasional carcass of an animal that fell into the water upstream.


Image: Field notes from George Lammers.

The clay at the bottom of the trench was probably deposited in Lake Agassiz, the giant lake that covered much of Manitoba as the glaciers melted at the end of the last Ice Age. Lake Agassiz receded from this area by 8,000 years ago, and this site tells us that the ancient Assiniboine River had already cut a  valley within a thousand years after the lake had left the area.

Sometimes we don’t have to travel far to find evidence of long past worlds!

Newspaper clipping with black and white photographs and the headline "Winnipeg Fossil Discovery at Least 6,000 Years Old".

References:

Lammers, G. 1969. Unpublished field notes for 12 November, 1969. Manitoba Museum of Man and Nature.

Winnipeg Free Press. 1970. Winnipeg fossil discovery at least 6,000 years old (March 14, 1970).

Nielsen, E., W.B. McKillop, and G.G. Conley. 1993. Fluvial Sedimentology And paleoecology Of Holocene alluvial deposits, Red River, Manitoba. Géographie Physique et Quaternaire, 47(2): 193-210.


Image: This article from the Winnipeg Free Press of March 14th, 1970, shows how exciting the Ruby Street find was considered at the time!

The Exhibit Collaboration

By Dr. Graham Young, past Curator of Palaeontology & Geology


An exhibit is a group invention. A curator devises and develops the content of the exhibit, deciding what specimens and other materials should be shown, and writing text about those materials. But most successful exhibits evolve through collaboration, in which the curator is but one player.

At this Museum, we have a well-defined process in which exhibits go through distinct development stages. Many people are involved as key decisions are made, and as work is carried out. There are, of course, the directors and administrators who ensure that schedules are followed and money is spent wisely, and who review the plans to ensure that they meet institutional standards and mandate. And there are the production experts who build casework, install lighting, create mounts, or make models. If specimens or artifacts are to be installed, then the collections and conservation staff will handle and treat them with the care they deserve. And there are meticulous editors who work diligently to check that “i”s are dotted and the “t”s are crossed, and not the other way around.

A section of the final time line layout.

This is a section of the final time line layout. The time line gives a very quick “Cook’s Tour” through key events in the first four billion years of Earth history.

A timeline graphic with notes and images for the exhibit.

If the exhibit depends on a spatial configuration of objects and information, then the curator may produce a sketch. This layout above was my first stab at fitting together materials for the exhibit. As with so many curatorial exercises, this first go had too many words!

Stephanie’s first draft layout is mostly concerned with where the big “blocks” of design will be located. The key considerations at this point are technical issues such as the height of exhibits relative to the viewer, the design of cases, and where access doors will be located.

A designer mock-up of an exhibit with silhouettes of visitors.

A first draft layout of an exhibit with blocks of text and images.

An initial layout with most of the content is rather “blocky”, and some details are higher on the wall than Stephanie would like. From my point of view, there are issues that some content is nowhere near where it should be on the time line. We like the colours and the overall feel, but there is a long way to go.

Draft titles have now been added, and the content has been shifted around so that it better matches the timeline. So now I am much happier, but Stephanie finds this way too busy, as do other staff. Images and text must be cut, and we are going to have to do some serious horse trading to come up with something that is acceptable to all concerned.

A designer mock-up of an exhibit with silhouettes of visitors.

A initial layout of an exhibit with blocks of text and images.

An final layout of an exhibit with blocks of text and images.

This one is nice and simple, but now a lot of content has been removed, and we will have to find a way to fit it back in.

The (almost) final design is radically different from what we started with. It is simpler, cleaner, yet it distills all the key points of exhibit content. There are still some place holder titles and images here, which will be modified in the final design as it goes to print.


Image: The final design of the exhibit.

Looking for the Invisible

By Kevin Brownlee, past Curator of Archaeology


I have long marveled at the beautiful stone woodworking tools that are in the archaeology collection at the Manitoba Museum and wondered what they were used for. It may seem like an odd question as these tools were obviously used for working wood. I wonder what past peoples made with these tools. Since understanding how all tools were used in the past is important for archaeologists, we are often searching for the invisible or the material culture that does not preserve. This is a major issue for archaeologists as we can only recover and study the durable material culture (stone, ceramic, bone). Non-durable items are rarely recovered and include items made from wood, bark, and hide. Although we can only study the durable material we must keep in mind the non-durable items that were used in the past.

An oblong carved stone tool with sharpened edges.

Stone Aaze from TMM collection.

An oblong carved stone tool with sharpened edges.

Stone adze from TMM collection.

An oblong carved stone tool with sharpened edges.

Stone adze from TMM collection.

The question remains… what were they making with these stone woodworking tools? Of course wood was very important to past people for constructing lodges; hide stretching frames and smoking racks. We also assume that finer items were carved including ladles, spoons, and bowls. Larger items were also manufactured including toboggans, snow shoe frames, paddles and canoes. By being aware of the non-durable materials and how durable items were used in the making of such items you can better appreciate the past and better interpret archaeological material.

A black and white photo of a hide stretched on a frame.

Moose hide on rack (TMM).

A black and white photo of a person using a tone tool to carve a wooden paddle.

John B. Moose making paddle (TMM).

One of many sophisticated technologies developed by First Nation people was the birch bark canoe. How long ago these were developed is unknown but populating the dense boreal forest of northern Manitoba 7,000 years ago would have been impossible without some form of water transportation.

Birch bark canoes were encountered by Europeans at contact and were far superior to any European water craft. Europeans quickly abandoned their boats in favour of First Nation made bark canoes, which were light and easily navigated the rivers and lakes of the interior.

On the left, two red antler pieces shaped into a pick and wedge. On the right, a charcoal drawing of a bone awl.

Contemporary birch bark canoe makers use a variety of tools including metal awls, axes, wooden wedges, froes, metal chisels, draw knives, and crooked knives. In the past bone awls, stone, antler and wood wedges, stone axes and adzes, bone chisels, and beaver incisors were used. We have found stone axes and adzes (woodworking tools), stone and antler wedges, bone awls, bone chisels at ancient camp sites and these may have been used in the manufacture of birch bark canoes. I had the good fortune this August to have the opportunity to participate in the making of a birch bark canoe. Although it was made during my vacation it gave me a better appreciation of this technology and how to interpret the archaeological collections at the Manitoba Museum.


Image: (Left) Antler pick and wedge (TMM), (Right) Moose bone awl drawing (TMM).

Stay tuned for my next blog that documents my experience in making and using a birch bark canoe.